I just wanted to thank all of you who left me such kind words about the loss of Fatty. It really me touched me to see that so many of you knew just how I felt and grieved along with me. I received beautiful emails, comments, and even a card in the mail.
Kimberly a special thanks for your comment and beautiful poem. I am so happy to know that there are people out there who I can connect with through these pages.
Thank you all again. Your thoughtfulness means so much to me.

Tuesday, April 29, 2008
Sunday, April 27, 2008
Beef Stroganoff
Tati and I took off and went to Things Made Wonderful today (my absolute favorite store). It was good to get away from the house. The ride up there is beautiful and Tati and I laughed and talked the whole way there. I needed that. They had an outdoor garden party so there were some little booths set up outside. It was nice. I picked up a few things, 2 really cute wooden daises for the yard and a new table runner for the kitchen. I was in much better spirits by the time I left the store.

Melt 3 Tbsp of butter in a large skillet on medium heat. Increase the heat to high/med-high and add the strips of beef. You want to cook the beef quickly, browning on each side, so the temp needs to be high enough to brown the beef, but not so high as to burn the butter. You may need to work in batches. While cooking the beef, sprinkle with some salt and pepper. When both sides are browned, remove the beef to a bowl and set aside.
In the same pan, reduce the heat to medium and add the shallots. Cook the shallots for a minute or two, allowing them to soak up any meat drippings. Remove the shallots to the same bowl as the meat and set aside.
In the same pan, melt another 3 Tbsp of butter. Increase heat to medium high and add the mushrooms. Cook, stirring occasionally for about 4 minutes. While cooking, sprinkle the nutmeg and the tarragon on the mushrooms.
Reduce the heat to low and add the sour cream to the mushrooms. You may want to add a tablespoon or two of water to thin the sauce (or not). Mix in the sour cream thoroughly. Do not let it come to a simmer or boil or the sour cream will curdle. Stir in the beef and shallots. Add salt and pepper to taste.
Serve immediately over egg noodles, fettuccine, potatoes, or rice. Serves 4.
I made Beef Stroganoff last night for supper from a recipe at Simply Recipes.com. What can I say, the girl can do no wrong. It was really tasty. John will be bringing the leftovers for work tomorrow. He starts his new job! Yeah!
Beef Stroganoff
6 Tablespoons butter
1 pound top sirloin or tenderloin, cut into 1 inch wide by 2 1 /2 inch long strips
1/3 cup chopped shallots
½ pound portabella mushrooms
salt to taste
pepper to taste
1/8 teaspoon nutmeg
½ teaspoon dry tarragon
1 cup sour cream, room temp
1 pound top sirloin or tenderloin, cut into 1 inch wide by 2 1 /2 inch long strips
1/3 cup chopped shallots
½ pound portabella mushrooms
salt to taste
pepper to taste
1/8 teaspoon nutmeg
½ teaspoon dry tarragon
1 cup sour cream, room temp
Melt 3 Tbsp of butter in a large skillet on medium heat. Increase the heat to high/med-high and add the strips of beef. You want to cook the beef quickly, browning on each side, so the temp needs to be high enough to brown the beef, but not so high as to burn the butter. You may need to work in batches. While cooking the beef, sprinkle with some salt and pepper. When both sides are browned, remove the beef to a bowl and set aside.
In the same pan, reduce the heat to medium and add the shallots. Cook the shallots for a minute or two, allowing them to soak up any meat drippings. Remove the shallots to the same bowl as the meat and set aside.
In the same pan, melt another 3 Tbsp of butter. Increase heat to medium high and add the mushrooms. Cook, stirring occasionally for about 4 minutes. While cooking, sprinkle the nutmeg and the tarragon on the mushrooms.
Reduce the heat to low and add the sour cream to the mushrooms. You may want to add a tablespoon or two of water to thin the sauce (or not). Mix in the sour cream thoroughly. Do not let it come to a simmer or boil or the sour cream will curdle. Stir in the beef and shallots. Add salt and pepper to taste.
Serve immediately over egg noodles, fettuccine, potatoes, or rice. Serves 4.
I served this over these really cool noodles that I found called Mafalde. The look like little mini lasagna and worked really well with this recipe.
Yellow Cupcakes with Chocolate Ganache Frosting
I can’t possibly cry anymore than I have in the last 3 days. Yesterday, for the 2nd morning in a row, I woke up with my eyes swollen almost shut. I laid down with some tea bags on them to try and reduce the swelling. It did help a little. I was up early, 6am. The house was silent, just me and my cup of tea; even Moose wasn’t getting out of bed to keep me company. I noticed my Mom cleared the house of anything that reminds me of Fatty. The Rubbermaid container that his food was in is gone, and there is no trace of cat food or treats. Friday morning I had thrown his food bowls in the trash. I just couldn’t look at them. John took his favorite blanket with him. His bed is also gone. The spot where it always was seems empty now. I don’t need “things” to remind of him. I have my memories and my photographs. I know there will come a time when I look back and smile and laugh and tell stories about him, but right now, I’m still hurting.
I kept myself busy yesterday to try and help lift this cloud of sadness that is lingering over me. We worked in the yard again. I stained the little wheel barrow John built for me, I cleaned out the armoire in the kitchen and I cleaned the fridge and washed every square inch of it. I even scrubbed the rubber molding with Q-tips. I know, I know, a bit compulsive, but it was dirty! John put the Beatles on for me because he knows they make me happy and after awhile I found myself singing along and before you know it I was looking for a cupcake recipe to make, cause we all know cupcakes make everyone a little happier.
I kept myself busy yesterday to try and help lift this cloud of sadness that is lingering over me. We worked in the yard again. I stained the little wheel barrow John built for me, I cleaned out the armoire in the kitchen and I cleaned the fridge and washed every square inch of it. I even scrubbed the rubber molding with Q-tips. I know, I know, a bit compulsive, but it was dirty! John put the Beatles on for me because he knows they make me happy and after awhile I found myself singing along and before you know it I was looking for a cupcake recipe to make, cause we all know cupcakes make everyone a little happier.

I had narrowed it down to dark chocolate or yellow cupcakes. I asked John to pick, he chose the yellow, so yellow it was. From Cooks Illustrated I bring you:
Yellow Cupcakes with Chocolate Ganache Frosting
1 ½ cups AP flour
1 cup sugar
1 ½ teaspoons baking powder
½ teaspoon salt
8 tablespoons (1 stick) unsalted butter, room temp
½ cup sour cream
1 large egg, room temp
2 large egg yolk, room temp
1 ½ teaspoons vanilla extract
Adjust oven rack to middle position; heat oven to 350 degrees. Line standard muffin/cupcake tin with paper or foil liners.Whisk together flour, sugar, baking powder, and salt in bowl of standing mixer fitted with paddle attachment. Add butter, sour cream, egg and egg yolks, and vanilla; beat at medium speed until smooth and satiny, about 30 seconds. Scrape down sides of bowl with rubber spatula and mix by hand until smooth and no flour pockets remain. Divide batter evenly among cups of prepared tin using 2-ounce ice cream scoop or heaping tablespoon. Bake until cupcake tops are pale gold and toothpick or skewer inserted into center comes out clean, 20 to 24 minutes. Use skewer or paring knife to lift cupcakes from tin and transfer to wire rack; cool cupcakes to room temperature, about 45 minutes.
Chocolate Ganache Frosting
1 cup heavy cream
8 oz semi-sweet chocolate chopped (I used chips)
Bring cream to boil in small saucepan or in microwave. Place chocolate in medium bowl and pour boiling cream over. Cover with foil and let stand 5 minutes. Whisk until smooth, then cover with plastic wrap and refrigerate until cool and slightly firm, 45 minutes to 1 hour.Transfer cooled chocolate mixture to bowl of standing mixer fitted with whisk attachment; whip mixture at medium speed until fluffy and mousse-like and forms medium-stiff peaks, about 2 minutes. Spread 2 to 3 generous tablespoons Chocolate Ganache Frosting on top of each cooled cupcake; serve.
These didn’t turn out as good as I expected. They were a little on the dry side but it might have been because I used the nut cups again. I think I left them in a bit too long. I had a half of one and they were edible, but not great. They really aren’t too pretty either.
Friday, April 25, 2008
FATTY
1987 - 2008

I suppose I could have titled this “Things that break my heart”, but I won’t do that. What happened this morning did make my heart ache in pain though. I have started and stopped writing this a dozen times, my words blinded by my tears, memories flooding my mind.
For the last 21 years Fatty has been a beloved and faithful cat. He brought me more joy then I could ever put into words. The little kitten that I picked up in 1987, that could fit in the palm of my hand, who has been my constant companion through all the ups and downs during half of my life is gone. He had a stroke last night. One minute he was out on the deck enjoying the sunshine and the next he was dragging his hind legs. I yelled for John. I knew it was bad. He called one of the Vets from work. I couldn’t listen. I knew what he was telling him. I knew.
Fatty had been failing steadily for well over 6 months. He’d have his good days and his not so good days. The last month or so his not so good days were outnumbering his good ones. He wasn’t even fat anymore. Just a shadow of the big round lump that he used to be.
I can say that he had a glorious life. He lived outside for most of the year, only venturing in during the chilly fall nights. He hibernated with us in the winter. His favorite spot was on the back of the couch. I would pick up him when he couldn’t jump up anymore, just so he could spend some time there, looking out the window.
When I was divorced and living on my own for the very first time in my life, it was often just Fatty and me. The boys Dad would come to take them and I was left alone in the house, petrified. Every night he would lie on the couch right above my head, and he would let one paw hang down so it touched me ever so slightly. I always liked to think that was his way of saying “I’m here Mama”.
He was hunter. I couldn’t even begin to count all the mice, moles, squirrels, and birds that he left for me over the years. Always making sure I saw his latest catch, happily purring and rubbing against my leg until I said “Good Job Fat Man” and gave him a scratch behind the ears. He was happiest outside, lying in a sunny spot, drinking out of the mini birdbath that he claimed as his watering dish.
He always kept us laughing. One of the funniest Fatty stories happened at Thanksgiving time. I had baked up a bunch of pies, wrapped them up and covered them in linen towels. I had them lined up on the stove. Thanksgiving morning I awoke to find Mr. Fatty comfortably curled up in one of my pies. He was quite content all balled up in my pumpkin pie. Must have had a nice warm nap. I wish I had a picture of that, but at the time I was quite perturbed with him, so I wasn’t reaching for the camera.
 He and Moose didn't get along so well at first. Fatty had been the king of the house for many years and he wasn't so happy to have Moose join the family. They slowly got used to each other. Over the past year they would lay on the couch together and even drink from the water bowl at the same time. They became buddies. You just couldn't help but love Fatty. He always looked cranky, in almost every picture he looks a little pissed off, but that was just him. Inside he was a big lovable mush.
  When he was younger he would announce that he was ready to come in by jumping up on the deck rail and inserting a claw into the screen of the kitchen window. He would snap that screen back and forth until you heard him and let him inside. Pretty smart kitty.
Mitch and John had to shave him a few times over the last few years. He had stopped grooming himself and became so matted that they had to get the industrial sized shears from work to shave his back. He looked so pitiful after those shaves, but he felt (and smelled) so much better.
.JPG)
As he got older, even his voice changed. He no longer meowed, he squeaked. Short little bursts of sound to let us know he was hungry, or wanted out. We discovered the squeak about a year ago. About 3am one morning I heard what I thought was one of the smoke detectors starting to loose battery power. You know how they make the annoying noise every 30 seconds or so? Well I heard that noise and nudged John to get outta bed and please pull the battery out until morning. When he returned to bed I asked him which smoke detector is was. “Fatty” he said. “That was Fatty. He was hungry”.

Two years ago John brought him into work to have a small tumor removed from his side. As the Doctor examined him he told John he couldn’t believe that he was 19 years old at the time. He was in great shape. His only complaint was that he purred so loud that he had trouble hearing his heartbeat. That was my Fatty, always purring, always happy. He really was the perfect cat.

John always said he was the first friend he made in Rhode Island.
He had been my friend for 21 long and happy years. I don’t think there is a cat out there that could have wished for a better life.

I will miss you my sweet boy.
Wednesday, April 23, 2008
Things that make me happy #12
 DAISIES
Not just any flower, but daisies in particular. I usually buy a bunch about every month or so since they almost always last about 3 weeks. I break a large bunch up into smaller groupings and scatter them around the house, sometimes in vases or old milk bottles, or this neat little vase I found today and just had to have. The top has a "frog". Not a ribbit frog, but a floral frog, which is little round holes to help the flowers stand up straight. I love it.
This months bunch is yellow. Last month my Mom got me a huge bunch of white ones for my birthday. Any color will do for me. They are my absolute favorite flower. I'll take a bunch over roses any day of the week.
Daises make me happy.
Check out the 2 new love nuts the guys found when they were diggin the flagpole.
Sunday, April 20, 2008
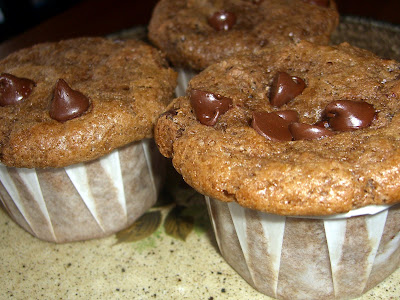
Chocolate Chocolate Chip Muffins
 Sometimes the mood just strikes you and you have to walk away from the cupcake recipes and make a muffin now and then. I like to think of cupcakes and muffins as cousins in the world of food. Similar, but still very different. Muffins conger up thoughts of breakfast, portable food, where the cupcake says celebration to me, birthdays and parties. Although I love my cupcakes, sometimes you just want a nice muffin and a big glass of milk.
This is yet another in my never ending pile of recipes I want to try. John and I split one in half to do a taste test. I got a big “Mmmm” outta him immediately, so I knew they were good before I even bit into my half. I said to him “this is a Nigella recipe, you know the dark haired English lady on Food Network?" For a second he tilted his head and scrunched up his nose, and then he said “Oh the one with the big boobs”. Yes honey, the one with the big boobs. Why am I not at all surprised at that?
These muffins, although light in texture, have a wonderful chocolaty flavor. I will definitely be making these again. I’m sure the big boobed lady will be proud.
Chocolate-Chocolate Chip Muffins
Nigella Lawson
1 3/4 cups all-purpose flour
2 teaspoons baking powder
1/2 teaspoon baking soda
2 tablespoons best quality cocoa powder
3/4 cup superfine sugar
3/4 cup semisweet chocolate chips, plus 1/4 cup for sprinkling
1 cup milk
1/3 cup plus 2 teaspoons vegetable oil
1 egg
1 teaspoon pure vanilla extract
Special equipment: Muffin tin with paper muffin cases (I used nut cups for a change)
Preheat the oven to 400 degrees F.
Put the flour, baking powder, baking soda, cocoa, sugar, and 3/4 cup of the chocolate chips into a large bowl. Pour all the liquid ingredients into a measuring jug. Mix the dry and wet ingredients together, remembering that a lumpy batter makes the best muffins. Spoon into the prepared muffin cases. Sprinkle the remaining 1/4 cup chocolate chips on top and then bake for 20 minutes or until the muffins are dark, risen and springy.
Baby Back Ribs

Yesterday was glorious. The weather could not have been more perfect. Low 70’s and sunny. We spent over 8 hours working in the yard. The kids rode their bikes and scooters, the dog and cat spent all day laying in the sunshine, we worked and sweated, and it felt oh so very good. I edged a new garden bed that I had made last year, we got out two of our three patio sets, washed them up for the season and had the back yard looking almost like summer again. We cleaned out the shed and purged all the old junk and toys the boys no longer play with and John finally got the flag pole he has wanted for over 6 years now, and put it in the ground. All the kids, even our neighbor Isabelle, wrote their names in the concrete. John was so happy to see his flag flying.

I knew it was going to be a hectic day, so I had made some pasta salad earlier on in the morning and had put a delicious rub on 3 racks of baby back ribs the night before. Every time we opened the fridge this fantastic smell came wafting out at us. The ribs slow cooked in the oven for about four hours on 250, tightly wrapped in foil. I could literally pull the bone right out of the meat. John threw them on the grill to crisp them up and then he poured on some BBQ sauce. They just melted in your mouth.
I used America’s Test Kitchen’s Rub. The only things I omitted were cayenne pepper and the white pepper, both of which I did not have, and also did not want to use. We are wimpy on the heat factor here, all of us cept John that is.
America’s Test Kitchen Rub
4 tablespoons paprika
2 tablespoons chili powder
2 tablespoons ground cumin
2 tablespoons dark brown sugar
1 tablespoon ground oregano
1 tablespoon granulated sugar
1 tablespoon black pepper
1 tablespoon ground white pepper
2 teaspoons cayenne pepper
Tuesday, April 15, 2008
.JPG)
.JPG)
.JPG)
.JPG)
.JPG)
.JPG)
.JPG)
.JPG)
.JPG)
Sunday, April 13, 2008
Smashed Potatoes
I had seen a post about smashed potatoes a few weeks ago on one of the many food blogs I frequent. I went back last night to try and find the post, and after a half hour of searching came up empty handed. So I decided to wing it and make up my own recipe with the help of what little I remember from the post I can no longer find.
 They were golden brown and nice and crunchy. Everyone loved them and went back for seconds. To me that's a true sign of some good eats.

I wanted crispy and crunchy potatoes with a creamy center. So here what I did:
Smashed Potatoes
12 small russet potatoes
olive Oil
crushed garlic
salt & pepper
heavy mallet
I bought a bag of russets and pulled out only the smallest of the bunch. That left me with 12, which was more than enough. I boiled them for about 15 minutes or just until I could insert a knife into the potato. Don't let them overcook and get mushy.
I placed them on a cotton towel and gently pressed on them, hoping the slight pressure would delicately smoosh them to perfection. That did not happen. Those spuds weren't giving. So I got out my mallet, called John, handed him the mallet and told him to get whacking. They were still placed between 2 towels. Don't skip that step or you will have mashed potatoes all over your kitchen. He had to pound them with a moderate amount of pressure to get them to moosh they way I wanted them, but that method worked out pretty well. Here's what they looked like post mooshed.
I placed them on a large cookie sheet lined with parchment paper and sprinkled them with some good olive oil. Put a good amount on. You don't want them swimming in oil, but you want to coat them well. I added some crushed garlic, and salt & pepper and baked them in a pre-heated 450 degree oven for about a half hour, or until they look good and crispy.
They were golden brown and nice and crunchy. Everyone loved them and went back for seconds. To me that's a true sign of some good eats.We also grilled up some teriyaki and ginger chicken, filet mignon (Thanks Ken, friends with expensive meat, always a perk!!), some delicious portabella's and Japanese eggplant. After that big lunch we all went into the living room and watched a video for the cruise that we will all be taking next August! Can you imagine the posts I'll have when I get back from that trip??
Supernatural Brownies
 Yesterday was a beautiful and sunny day. The kind of day that most people will call a "Spring Fever Day". This is was 3rd day in a row that it's been sunny and mild out. It just puts everyone in a great mood. I could hear kids playing, and lawn mowers starting up for the first time since fall, and my neighbor slowly creeping out of their house from their winter hibernation. Friday night was so mild that John and I were out in the yard after dark, just sitting on the deck enjoying being outside. Saturday night, as you saw, we had our first fire in the pit!
Although I had to work this week, John was off and had done a lot of work in the yard. I can now see the peeking heads of all my perennials. It's so good to see green again. I actually opened the windows for the first time in ages. There was this gentle breeze blowing as I stood over the sink doing dishes. That first fresh breeze of spring felt so good. We had something else happen that put us in a good mood this weekend too. John had applied for a job in another department at Brown. It was a job that he had wanted ever since he started working for the University. After 2 weeks of waiting for a decision, he got a call Friday offering him the job! We were ecstatic! Very happy news for our family!
Brownies are always part of a celebration right? This is a recipe that I had been meaning to get around to for quite some time. I had bought the chocolate a few weeks ago so I don't know why I waited so long to make these. They were pretty simple to make. You don't even need to get your mixer out for this one. The recipe said "Note: For best flavor, bake 1 day before serving, let cool and store, tightly wrapped". So that's what I did. I made these Saturday afternoon. We are having our friends Eva & Ken over this afternoon to have a little congratulatory celebration for John, so I saved these babies for dessert. I hid them wrapped in a towel in the breezeway in case anyone might have had some trouble with temptation…like me!
Supernatural Brownies
from “Chocolate: by Nick Malgieri
2 sticks (16 tablespoons) butter, more for pan and parchment paper
8 ounces bittersweet chocolate
4 eggs
1/2 teaspoon salt
1 cup dark brown sugar, such as muscovado
1 cup granulated sugar
2 teaspoons vanilla extract
1 cup flour
1/2 cup chopped walnuts or 3/4 cup whole walnuts, optional.
1. Butter a 13-by-9-inch baking pan and line with buttered parchment paper. Preheat oven to 350 degrees. In top of a double boiler set over barely simmering water, or on low power in a microwave, melt butter and chocolate together. Cool slightly. In a large bowl or mixer, whisk eggs. Whisk in salt, sugars and vanilla.
2. Whisk in chocolate mixture. Fold in flour just until combined. If using chopped walnuts, stir them in. Pour batter into prepared pan. If using whole walnuts, arrange on top of batter. Bake for 35 to 40 minutes or until shiny and beginning to crack on top. Cool in pan on rack. Yield: 15 large or 24 small brownies.

As you can see from the pictures, this made a dense, chewy, thick brownie, almost fudge like. With one confirmed chocoholic in the house, and 3 boys (my 2 + nephew) who love brownies, I’m sure they will be gobbled right up.
Saturday, April 12, 2008
Turkey Burgers

My nephew is sleeping over for the next few nights and I know one of his favorite things to eat is hamburgers. Instead of the traditional ground beef burgers I made Cook's Illustrated Turkey Burgers. I remember the first time I made these, my carnivorous husband raised his eyebrows at me. Turkey burgers?? Yeah turkey burgers. I had eaten the frozen variety for years. I always had a package of them in the freezer for cookouts. After I made this recipe, I stopped buying the frozen burgers. I usually double the recipe and freeze half of the patties. When I cook them indoors I always use my big cast iron frying pan. These are so moist and juicy, you won't even remember you're not supposed to like them that much.
Turkey Burgers
from Cooks Illustrated
This recipe will enrich store-bought ground lean turkey so that it makes excellent burgers. Ricotta cheese can burn easily, so keep a close watch on the burgers as they cook.
1 ¼ pounds 93 percent lean ground turkey
½ teaspoon salt
½ teaspoon ground black pepper
2 teaspoons Worcestershire sauce
½ cup ricotta cheese
2 teaspoons Dijon mustard
1 tablespoon vegetable oil or canola oil
1. Transfer ground meat to medium bowl. Stir in salt, pepper, Worcestershire sauce, ricotta cheese, and mustard until blended, and divide meat into 4 portions. Lightly toss one portion from hand to hand to form a ball, then lightly flatten ball with fingertips into 1-inch-thick patty. Repeat with remaining portions.

2a. To Cook Indoors: Heat a large, heavy skillet (preferably cast-iron or stainless steel with an aluminum core) over medium heat until very hot, 4 to 5 minutes. Swirl oil in pan to coat bottom, then add burgers. Cook over medium heat without moving burgers until bottom side of each is dark brown and crusted, 3 to 4 minutes. Turn burgers over; continue to cook until bottom side is light brown but not yet crusted, 3 to 4 minutes longer. Reduce heat to low, position cover slightly ajar on pan to allow steam to escape, and continue to cook 8 to 10 minutes longer, flipping burgers if necessary to promote deep browning, until center is completely cooked, or an instant-read thermometer inserted from the side of the burger into the center registers 160 degrees. Remove from pan and serve immediately.
2b. To Grill: Alternatively, grill burgers over medium-low fire (you can hold your hand about 5 inches above grill surface for 5 seconds) until dark spotty brown on bottom sid e, 7 to 9 minutes. Turn burgers over; continue grilling 7 to 9 minutes longer or until bottom side is dark spotty brown and center is completely cooked or instant-read thermometer registers 160 degrees. Remove from grill and serve immediately.
from Cooks Illustrated
This recipe will enrich store-bought ground lean turkey so that it makes excellent burgers. Ricotta cheese can burn easily, so keep a close watch on the burgers as they cook.
1 ¼ pounds 93 percent lean ground turkey
½ teaspoon salt
½ teaspoon ground black pepper
2 teaspoons Worcestershire sauce
½ cup ricotta cheese
2 teaspoons Dijon mustard
1 tablespoon vegetable oil or canola oil
1. Transfer ground meat to medium bowl. Stir in salt, pepper, Worcestershire sauce, ricotta cheese, and mustard until blended, and divide meat into 4 portions. Lightly toss one portion from hand to hand to form a ball, then lightly flatten ball with fingertips into 1-inch-thick patty. Repeat with remaining portions.

2a. To Cook Indoors: Heat a large, heavy skillet (preferably cast-iron or stainless steel with an aluminum core) over medium heat until very hot, 4 to 5 minutes. Swirl oil in pan to coat bottom, then add burgers. Cook over medium heat without moving burgers until bottom side of each is dark brown and crusted, 3 to 4 minutes. Turn burgers over; continue to cook until bottom side is light brown but not yet crusted, 3 to 4 minutes longer. Reduce heat to low, position cover slightly ajar on pan to allow steam to escape, and continue to cook 8 to 10 minutes longer, flipping burgers if necessary to promote deep browning, until center is completely cooked, or an instant-read thermometer inserted from the side of the burger into the center registers 160 degrees. Remove from pan and serve immediately.
2b. To Grill: Alternatively, grill burgers over medium-low fire (you can hold your hand about 5 inches above grill surface for 5 seconds) until dark spotty brown on bottom sid
 e, 7 to 9 minutes. Turn burgers over; continue grilling 7 to 9 minutes longer or until bottom side is dark spotty brown and center is completely cooked or instant-read thermometer registers 160 degrees. Remove from grill and serve immediately.
 After dinner it was still so nice out that we decided to have our first fire of the season. John burned up all the stick that he and the boys had raked up in the yard. I like to think of the fire pit as out little handy recycler. We have very little yard waste because we burn most of it, plus it looks and smells so prutty!
Evan and Ryan even ate their cupcakes in the glow of the fire.
Firecracker Shrimp

I am becoming a regular at the Asian market that I discovered was only 15 minutes from my house thanks to Jaden at Jadens Steamy Kitchen, who's blog I follow like a bible. She makes some of the most incredible food I have ever seen, so I thought it was about time I tasted some too. This is her recipe for Firecracker Shrimp - so called cause they look like little firecrackers.
I made a batch of these up as an appetizer for John who had gone to a Beer Fest today with my brother, since I knew they could use some food to sop up all the booze.
These were absolutely delicious. Evan took one bite of one of mine, walked over to the plate and grabbed three more.
Firecracker Shrimp
25 large tail-on shrimp, deveined and nicked (see above)
15 eggroll/springroll wrappers, cut in half diagonally (2 triangles)
Oil for frying
Marinade 1 tsp minced garlic 1/2 tsp grated ginger (using rasp grater) 1/2 tsp sesame oil 1 tsp soy sauce 1 tsp sweet chili sauce 1 tsp cornstarch
Cornstarch "paste" (mix well to form paste) 1 Tb cornstarch 1/4 cup water
1. Combine marinade ingredients in bowl, marinate shrimp for 20 minutes.
2. Pat the shrimp dry with a paper towel. Wrap each shrimp in a eggroll/springroll wrapper half. Seal with cornstarch paste.
3. Fry in hot oil (375) for 3 minutes, until golden brown and shrimp is cooked through. Serve with sweet chili sauce for dipping.
You can see the lovely Jaden in action here:http://www.mysuncoast.com/Global/story.asp?s=8060523 Click on "featured video". That will show you how to roll up the shrimp.

The beautiful plate and matching bowl were made by Becky from Dirt Girl Pottery . I love her stuff. You can find her here: http://www.etsy.com/shop.php?user_id=5286233
Pioneer Woman's Onion Strings
John loves Onion Rings. Whenever we are out and there is a choice of fries or onion rings, he will pick the onion rings every time. Me, I'm a bit picky about my onion rings. I don't like those big honking 3 inch thick onion rings that the batter slides off of as soon as you take a bite, and I have found that those are usually the ones that are served in most restaurants. Easy, frozen, greasy, fat onions rings. Yuck! But Onion Stings, oh hold on now, those are a very different thing entirely. If Onion Strings are on the menu, which doesn't happen very often, I would order them in a heartbeat. So imagine how happy I was when I saw Pioneer Woman's recipe for Onion Strings. It totally makes up for the fact that even though I enter every single contest she has, and that I love every single prize that she offers, I have never ever won. The last contest was for a $400 Williams Sonoma gift card! $400! I'm drooling just thinking about the damage I could do in that store with that much money. I'm going to keep trying though, cause I want so very badly to win and have it be to a store where I could put it towards that Nikon I have been eyeing. I know it will probably never happen, but it keeps me going.

Slice onion very thin. Place in a baking dish and cover with buttermilk for at least one hour. Combine dry ingredients and set aside. Heat oil to 375 degrees. Grab a handful of onions, throw into the flour mixture, tab to shake off excess, and PLUNGE into hot oil. Fry for a few minutes and remove as soon as golden brown. Repeat until onions are gone. Eat before your family sees them. Repeat with another onion, because they’ll be really mad they didn’t get any.
Ok enough that whining....on to Onion Strings, the perfect accompaniment to my turkey burgers.
Pioneer Woman's Onion Strings
1 large onion
2 cups buttermilk
2 cups flour
1 scant tablespoon salt
Lots of black pepper
1/4 to 1/2 teaspoon Cayenne Pepper
Canola Oil
Slice onion very thin. Place in a baking dish and cover with buttermilk for at least one hour. Combine dry ingredients and set aside. Heat oil to 375 degrees. Grab a handful of onions, throw into the flour mixture, tab to shake off excess, and PLUNGE into hot oil. Fry for a few minutes and remove as soon as golden brown. Repeat until onions are gone. Eat before your family sees them. Repeat with another onion, because they’ll be really mad they didn’t get any.
Much obliged PW.
Vanilla Buttermilk Cupcakes
I sat on the couch last night, and while the Red Sox played in the background, I scoured through my cookbooks for a vanilla cupcake recipe that included everything I had on hand. I’ve been to the grocery store one to many times this week. Nothing really struck me so I gave up and came to the computer (Sox were losing anyway). I did a food blog search and found a recipe for Vanilla Buttermilk Cupcakes on Baking Bites. Looked good to me and I did have buttermilk in the fridge, so I whipped up a batch this morning. I frosted these with one of my favorite buttercream frostings. Jesse is fishing today and staying at his Dad’s so I have Evan and my nephew Ryan tonight. This will be an after dinner treat. 
Vanilla Buttermilk Cupcakes
1 1/3 cups all purpose flour
½ teaspoon baking soda
½ teaspoon baking powder
¼ teaspoon salt
1 cup sugar
¼ cup butter, room temperature
1 large egg
1 teaspoon vanilla
¼ tsp almond extract
1 cup buttermilk
Makes 12 cupcakes
Chocolate Buttercream Frosting
1 stick butter - room temp
1/2 cup unsweetened cocoa
4 cups confectioners’ sugar
1/4 cup milk (plus a few dashes to adjust consistency)
1 teaspoon vanilla.
Beat butter & cocoa until smooth, then add sugar one cup at a time, beating with each addition. Add milk & vanilla and beat about 3 minutes.

Vanilla Buttermilk Cupcakes
1 1/3 cups all purpose flour
½ teaspoon baking soda
½ teaspoon baking powder
¼ teaspoon salt
1 cup sugar
¼ cup butter, room temperature
1 large egg
1 teaspoon vanilla
¼ tsp almond extract
1 cup buttermilk
Preheat oven to 350F. Place liners in a 12 cup muffin tin.In a medium bowl, stir together flour, baking soda, baking powder and salt.In a large bowl, using an electric mixer, beat the butter and sugar together until it looks creamy. Beat in the egg and the vanilla and almond extracts until mixture is smooth.Add half of the flour mixture to the butter mixture and stir until almost combined. Add buttermilk and stir, again, until almost combined. Add the rest of the flour and stir until all ingredients are mixed in.
Makes 12 cupcakes
Chocolate Buttercream Frosting
1 stick butter - room temp
1/2 cup unsweetened cocoa
4 cups confectioners’ sugar
1/4 cup milk (plus a few dashes to adjust consistency)
1 teaspoon vanilla.
Beat butter & cocoa until smooth, then add sugar one cup at a time, beating with each addition. Add milk & vanilla and beat about 3 minutes.
Tuesday, April 8, 2008
Things that make me happy #11
ETSY FINDS!

Yup another Etsy find. I really should lay off Etsy for a while; I would probably save myself a lot of money, but I just can’t stay away cause there are so many beautiful things to see (and buy!).
I am a sucker for pottery (and baskets and bowls and fireflies, the list goes on and on).
So I’m browsing and I see this beautiful tile that says, “I love cupcakes”. Hey! I do love cupcakes, and pottery, and here they are together! This is an item with my name written all over it! So I browse the hundreds and hundreds of sayings that they have to offer and I see “Mangia” which for those of you who don’t know means ‘eat’ in Italian. Maniga is a word that I will always associate with my Dad, yes because it’s Italian, but mostly because I can vividly remember him saying it all the time when we were at the dinner table. “Mangia! Maniga!” or “Sedersi Mangia” (Sit down and eat!). He also never said cucumbers in English, he always said cetrioli. Cetrioli sounds like shit-trolli when you say it, so we always got a kick out of it when he said it cause it sounded like he was swearing and when you are 9 years old, that’s funny stuff.
So I wanted to share of picture of my beautiful tiles. Her Etsy shop is here:
http://www.etsy.com/shop.php?user_id=5089174
And her website is here:
http://www.passionpottery.com/
She included a small tile that said "Smile" and on the back were instructions to "pass it on". I thought that was the sweetest thing. She can also custom make you any tile that you’d like. Oh you know I'm thinking about that!
Monday, April 7, 2008
Taco Ring
 Last week my mom and I went to Taste of Home Magazines Cooking School. I’ve been to one before. You get a nice goodie bag, a few free special issue magazines and a chance at a lot of door prizes and you see a demo of about 6 recipes. My mom and I didn’t win anything this time around. The time before when we attended I won one of the dishes that they prepared, including the pan it was cooked in so that was pretty cool. None of the dishes they made really excited me, but there was one that looked interesting. They called it a Taco Meatball Ring. I liked the concept, but the fact that there were whole meatballs in it turned me off, so I got to thinking about making this a different way.
Here’s what I came up with.
Lisa’s Taco Ring
1 ½ pounds ground beef
3/4 cup water
1 package of taco seasoning
2 tubes refrigerated crescent rolls (8 ounces each)
1 cup shredded cheddar cheese
1 medium onion
½ cup sliced olives
Cook the onions until they are soft and translucent, add the ground beef and cook until browned. Drain and return to pan. Add in a package of taco seasoning and ¾ of a cup of water. Cook just until water is absorbed. Set aside and let it cool a bit. Add in 1 cup of shredded cheddar and the olives. You could also add additional ingredients at this point, i.e., jalapeños, diced tomatoes, make it your own.

Arrange the crescent rolls on a greased deep dish pie pan forming a ring with the pointed ends facing outward. I used 11 of the crescents to line the pan and the last one to fill the gap at the bottom of the pan. I will look like a big radiating sun.
Fill the pan with the beef mixture. Pull the ends of the crescent rolls towards the middle. Bake at 350 until golden brown.
I served this with some shredded lettuce and sour cream.
Consensus was: “This is great Mom!” Definitely a kid pleaser.
Sunday, April 6, 2008
Chicken and Dumplings
As soon as I saw this recipe being made on America's Test Kitchen, I went out the very next day and bought all the ingredients to make it. It was back when Mitchell was still living in RI, and I remember John and Mitch raving about it. It's the perfect cross between stew and soup. Creamy and rich and just the right thing to warm your bones as my Gram used to say.

It may look like a lot of ingredients, but it all comes together very fast and the end result is so fantastic, you won't care how long it took you to make (and it really doesn't take that long). Make sure not to peek at the dumplings while they are cooking.
This recipe has become a staple in my house. Mitch I wish you were here to eat it with us.
Don't use low-fat or fat-free milk in this recipe. Start the dumpling dough only when you're ready to top the stew with them.
Chicken and Dumplings
from Cooks Illustrated
5 pounds bone-in, skin on chicken thighs (usually is about 12-13 thighs)
table salt/ground black pepper
4 teaspoons vegetable oil
4 tablespoons unsalted butter (1/2 stick)
4 carrots, peeled and sliced ¼ inch thick
2 ribs celery, sliced ¼ thick
1 large onion, minced
6 tablespoons unbleached flour
¼ cup dry sherry (I substitute white wine)
4 ½ cups low sodium chicken broth
¼ cup whole milk
1 teaspoon minced fresh thyme leaves
2 bay leaves
1 cup frozen peas
3 tablespoons minced fresh parsley
Dumplings
2 cups unbleached all purpose flour
1 tablespoon baking powder
1 teaspoon salt
1 cup whole milk
3 tablespoons reserved chicken fat (or unsalted butter)
1. For the Stew: Pat the chicken dry with paper towels, then season with salt and pepper. Heat 2 teaspoons of the oil in a large Dutch oven over medium-high heat until just smoking. Add half of the chicken and cook until golden on both sides, about 10 minutes. Transfer the chicken to a plate and remove the browned skin. Pour off the chicken fat and reserve. Return the pot to medium-high heat and repeat with the remaining 2 teaspoons oil and the remaining chicken. Pour off and reserve any chicken fat.
2. Add the butter to the Dutch oven and melt over medium-high heat. Add the carrots, celery, onion, and 1/4 teaspoon salt and cook until softened, about 7 minutes. Stir in the flour. Whisk in the sherry, scraping up any browned bits. Stir in the broth, milk, thyme, and bay leaves. Nestle the chicken, with any accumulated juices, into the pot. Cover and simmer until the chicken is fully cooked and tender, about 1 hour.
3. Transfer the chicken to a cutting board. Discard the bay leaves. Allow the sauce to settle for a few minutes, then skim the fat from the surface using a wide spoon. Shred the chicken, discarding the bones, then return it to the stew.
4. For the Dumplings: Stir the flour, baking powder, and salt together. Microwave the milk and fat in a microwave-safe bowl on high until just warm (do not over-heat), about 1 minute. Stir the warmed milk mixture into the flour mixture with a wooden spoon until incorporated and smooth. 5. Return the stew to a simmer, stir in the peas and parsley, and season with salt and pepper. Following the photos below, drop golf-ball-sized dumplings over the top of the stew, about 1/4 inch apart (you should have about 18 dumplings). Reduce the heat to low, cover, and cook until the dumplings have doubled in size, 15 to 18 minutes.
No-Knead Bread
 This is yet another recipe from the New York Times. No-Knead bread from Jim Lahey at the Sullivan Street Bakery in NYC.
What in this big blue marble is more comforting and inviting than fresh baked bread? Fresh baked bread that you don’t have to knead! Yes my friends, NO-KNEAD bread that is fabulous! All you need is time. About 18 hrs of it and you will find yourself slicing into a loaf of the most scrumptious bread your mouth has ever tasted. The crust is incredible, crunchy and crisp, and the bread itself is light and delectable. I can imagine people coming over for dinner and thinking that I stopped at an Artisan bread shop to buy it, it’s that good.
You need a heavy 6 to 8 quart pot, cast iron, enamel, ceramic, etc. This produces a very wet sticky dough which the yeast loves. Even if you wanted to knead it, you would find it impossible, it kind of just goops out the bowl. Baking it in the oven in a pot creates a misty, humid environment and the bread just loves that. The moisture keeps the bread chewy and makes the crust to die for. If you only make one loaf of bread in your entire life, let it be this one.
No-Knead Bread
Jim Lahey at the Sullivan Street Bakery
3 cups all purpose flour or bread flour, more for dusting.
¼ teaspoon instant yeast
1 ¼ teaspoon salt
1 5/8 cup water (I used 1 ½ plus 2 tablespoons)
Cornmeal or wheat bran for dusting.
In a large bowl combine flour, yeast and salt. Add water and stir until blended. Dough will be shaggy and sticky. Cover bowl with plastic wrap and let rest at least 12 hours, preferably 18 at a warm room temperature (70 degrees).
Dough is ready when the surface is dotted with bubbles. Lightly flour a work surface and place dough on it. Sprinkle with a little more flour and fold it over on itself once or twice. Cover loosely with plastic wrap and let rest for 15 minutes.

This is what it should look like. See all the bubbles?
Using enough flour to keep the dough from sticking to the work surface or to your fingers, gently and quickly shape the dough into a ball. Generously coat a cotton towel (not terry cloth) with flour, wheat bran or cornmeal. Cover with another cotton towel and let it rise for 2 hours. When it is ready, the dough will be more than double in size and will not readily spring back when poked.
At least a half hour before the dough is ready, heat the oven to 450. Put a 6 to 8 heavy covered pot in the oven as it heats. When the dough is ready, carefully remove the pot from the oven. Slide your hand u
 nder the towel and turn the dough over into the pot, seam side up; it may look like a mess, but that’s ok. Shake the pan once or twice if the dough is unevenly distributed; it will straighten out as it bakes. Cover with lid and bake for 30 minutes, then remove lid and bake another 15 to 30 minutes, until loaf is beautifully browned. Cook on rack.
This bread is so good you don’t even need to butter it.
Quick Whole Wheat & Molasses Bread
 I’m always looking for great quick, hearty breads. We are a “take your lunch to school/work” kinda family, so variety in the breads that we eat is a must. I find most of the school lunches are just too unhealthy and I really don’t want my kids eating them. If I pack their lunch then I know what there eating. Most of the time they tell me the other kids are envious that they get such good lunches. That makes me happy.
My kids have grown up on wheat and whole grain breads. I just don’t buy white bread. When Jesse was in Kindergarten he came home one day and announced to me with great shock that some of the kids eat bread that is white! It perplexed him. I didn’t realize until then that he never had been exposed to it. Both my kids prefer whole grain bread over white any day. My husband would eat white bread over whole grains any chance he gets. I did buy one loaf since he moved here and it made him very happy. “You bought white bread!” It was like he was opening a Christmas present. He sti
 ll tries to sneak the white bread into the grocery cart on the rare occasions that he accompanies me shopping. It ain’t workin’ for him.
So I came across this recipe when I was looking through the New York Times recipe log. It’s from Mark Bittman. I made this bread in the time it took the oven to heat up. That’s how fast and easy it is. Even if you have never made bread before…..you can do this! It’s that easy. Trust me! Of course I made 2 loaves cause 1 loaf of good bread in a house with 3 men (well 1 man and 2 almost teenagers) will not last, plus I always share. Some bread will be dropped off at John & Tati's house tomorrow morning. This bread is rich and earthy and the perfect accompaniment to any soup or stew. I'll be having 2 thin slices with cucumber and cream cheese for my lunch tomorrow. Make this bread!
Quick Whole Wheat and Molasses Bread
Oil or butter for greasing pan
1 2/3 buttermilk or plain yogurt, or 1 ½ cups milk and 2 Tablespoons of white vinegar (See step 2)
2 ½ cups (about 12 ounces) whole wheat flour
½ cup cornmeal
1 teaspoon salt
1 teaspoon baking soda
½ cup molasses
Heat oven to 325. Grease an 8x4 inch or 9x5 inch loaf pan, preferably nonstick.
If using buttermilk or yogurt, ignore the step to make your own buttermilk (or soured milk). To make soured milk: warm milk gently – 1 minute in the microwave, just enough to take the chill off – add 2 tablespoons white vinegar. Set aside.
Mix together all the dry ingredients. Stir molasses into the buttermilk. Stir liquid into dry ingredients (just enough to combine – don’t over mix!!) Pour into loaf pan. Bake until firm and a toothpick inserted into the center comes our clean. 45 minutes to 1 hour. Cool on rack for 15 minutes before removing from pan.
Yield – 1 loaf.
Saturday, April 5, 2008
Ina's Coconut Cupcakes
 I can't even remember the last time I made these cupcakes. I think it was when I first got Ina's cookbook. I watched her make them on the Barefoot Contessa, turned off the TV and got started on a batch. I know it's been years since I have made them. What a shame. These are the most delicious coconut cupcakes you will ever have. I usually frost them with her cream cheese frosting and top them with some toasted coconut, but today I thought a chocolate and coconut combination would be fun.
Ina's Coconut Cupcakes
3/4 lb unsalted butter at room temp (3 sticks) I know it’s a lot of butter, but it’s so worth it!
2 cups sugar
5 extra large eggs at room temp
1 1/2 teaspoons pure vanilla extract
1 1/2 teaspoons pure almond extract
3 cups all purpose flour
1 teas baking powder
1/2 teaspoons baking soda
1/2 teaspoons salt
1 cup buttermilk
7 ounces sweetened shredded coconut
Preheat oven to 35o.
In the bowl of an electric mixer fitted with a paddle attachment, cream the butter and sugar until light and fluffy, about 5 minutes. With the mixer running on low, add the eggs one at a time, scraping down the bowl after each addition. Add the vanilla and almond extracts and mix well.
In a separate bowl, sift together the flour, baking powder, baking soda, and salt. In three parts, alternately add the dry ingredients and the buttermilk to the batter, beginning and ending with the dry. Mix until just combined. Fold in 7 ounces of coconut.
Line a muffin pan white paper liners. Fill each cup to the top with batter (I used an ice cream scoop to fill mine). Bake for 25 to 35 minutes until the tops are brown and a toothpick comes out clean. Allow to cool in the pan for 15 minutes. Remove to a baking rack and cool completely. Frost and sprinkle with the remaining coconut.
I used my stand by Chocolate Buttercream Frosting recipe. This one has never let me down. It's smooth and just chocolaty enough.

Chocolate Buttercream Frosting
1 stick butter - room temp
1/2 cup unsweetened cocoa
4 cups confectioners sugar
1/4 cup milk (plus a few dashes to adjust consistency)
1 teaspoon vanilla.
Beat butter & cocoa until smooth, then add sugar one cup at a time, beating with each addition. Add milk & vanilla and beat about 3 minutes.
Tuesday, April 1, 2008
WHOOPIE!
 Pies that it!
We went to Hershey, PA on vacation last year. The highlight of the trip for my kids wasn’t Hershey Park, or the Chocolate Factory, or Amish Country, it was Whoopie Pies. We went to a great farmers market in Bird in Hand, PA and there were a few stands selling Whoopie Pies made by the Amish. They were huge chocolaty discs, bigger than Evan’s 11 year old hands. The boys were in heaven and couldn’t wait to get back to the hotel to devour their pies. I wasn’t aware that some people on the West Coast have never heard of these, but after reading about them on Baking Bites.com (where I originally found this recipe), I was informed that our neighbors to the left might not have any idea what they are. From Baking Bites:
A Whoopie Pie is a commonly found treat in New England, but is relatively unknown elsewhere, especially on the West Coast. The pies are not really pies at all, as you have probably discerned from the photo above, but are two chocolate cookie/cake discs with a vanilla cream filling sandwiched between them. They’re not like sandwich cookies and not like cream filled cupcakes, but are an entity unto themselves. No one can say for certain where the name came from, though the most widely held belief is that they were named after the reaction that they were intended to elicit from people who ate one.
 There's Evan eating a giant whoopie pie back at the hotel room in PA last year.
These are a smaller petite version of the giant pies we got in Amish country. They are almost devil dog like, but not quite. This recipe made up a batch of 24 (48 tops & bottoms). I had more than enough filling. You really don’t want the middle gushing out when you bite into one. Most of the cream filling recipes that I have come across use shortening which can give the cream a gritty bite. I was happy to see shortening omitted in this version.

Normally I would print the recipe here but this one was originally printed in the cookbook The Good Cookie by Tish Boyle. Since I don't wanna get hauled off to blogger jail, I'm going to link this one. You can find it on the Leite's Culinaria site:
Go make this recipe and don't forget to pour yourself a big glass of milk to eat them with.
Subscribe to:
Posts (Atom)