Friday, July 27, 2012

Fresh Ginger Dressing

Ginger Dressing

I'm getting a little slacky with the blog.

I'm not apologizing. I said many times before, I blog when I want to. I need to have the freedom not to post if I don't feel like it. If blogging was my full time job then things might be different, but when you are away from the house at work for 40+ hours a week, it just can't be.

So I might have 10 recipes ready for posting, some of the pics may be downloaded from the camera, some not. Lots of posts sit in queue, waiting for me to write something. Pictures and a recipe stuck on a page waiting for my words.

As I said in my "Summer Lovin'" post, I'm really trying, despite the hot weather, to enjoy my summer, and most times that does not include sitting in front of a computer. Sorry, but that's just how it is.

Fall and winter will be here before you know it and the folder of all the delicious soups, stews and casseroles will come out of it's home and beg me to heat the oven up and share it all with you friends, but right now it's time to break out the cooler menus.

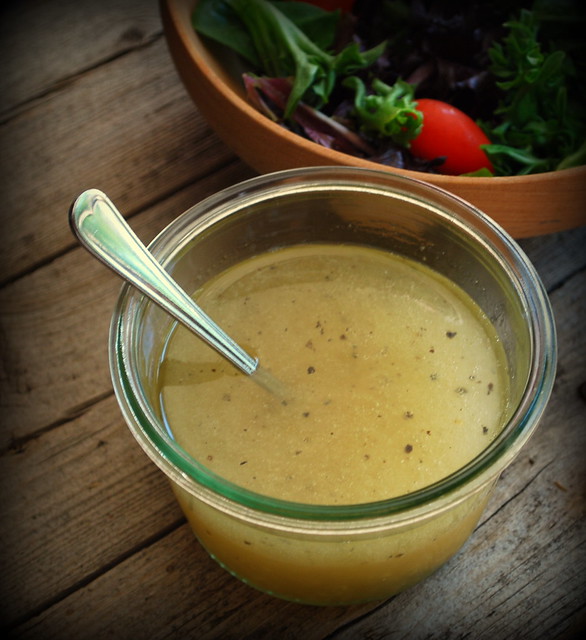
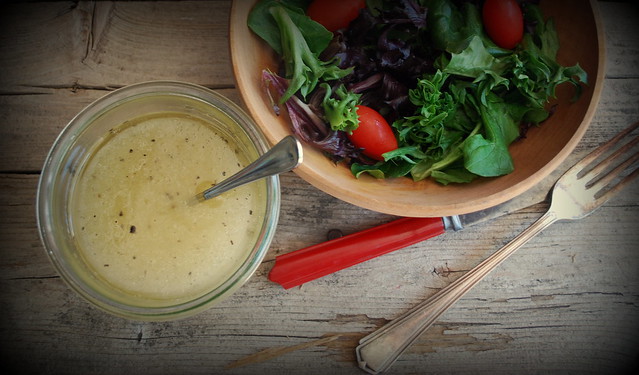
Like a lot of you, we have been eating lots of salads, and while we do enjoy some of the prepared dressings you can buy, nothing beats making your own...and it's so simple.

This fresh ginger dressing is absolutely delicious. Your salad greens will be doing a happy dance before they get to your mouth.

I found this on A Farm Girl Dabbles. The recipe is from her grandma for goodness sake. A grandma recipe. It just has to be good.

Ginger Dressing1

Fresh Ginger Dressing
recipe from A Farm Girl Dabbles
½ cups vegetable oil
½ cups rice vinegar (or regular white vinegar)
⅓ cups honey
1 tablespoon grated fresh ginger
Pinch of kosher salt & pepper

Combine all ingredients in a pint jar and shake vigorously. That’s it! Serve with your favorite fresh greens. Keeps well in the refrigerator for 1 week.

Monday, July 23, 2012

Piña Colada Frosties

Pina Colada Frostie 2

I have a few recipes that just scream summer.

My Frozen Pina Colada Pie is one of them and this Banana Split Cake is another.

They are refreshing and light and super flavorful and the best part about them all is you don't have to heat your oven up to make them.

Another great perk....you can make them a day or two ahead of time, so no rushing when you are getting ready to head out to a cookout or BBQ.

Pina Colada is one of my most favorite flavor combinations. I LOVE coconut. LOVE pineapple too! Toasted coconut - fuggetaboutit. I'm over the edge.

I found this recipe on Mr. Food. He's got some really great recipes on his site, this recipe being one of them. I did change things up a tiny bit from the original. The original recipe called for maraschino cherries.

I don't like maraschino cherries. Those preserved, sweetened jarred bits cooked in syrup just make me gag. Yuck. So I substituted fresh cherries. I think strawberries would work too.

Pina Colada Frostie 1


Pina Colada Frosties
adapted from a recipe on Mr. Food
1 (12 ounce) container of cool whip, thawed
1 (15 ounce) can of cream of coconut – NOT coconut milk! (see note)
1 (8 ounce) can crushed pineapple, well drained
½ cup finely chopped fresh cherries or strawberries
½ cup sweetened flaked coconut
toasted coconut for topping.

In a large bowl combine the cool whip and cream of coconut. Mix well and add all the rest of the ingredients. Top with toasted coconut if desired. Scoop into paper muffin cups. I used an ice cream scoop. Freeze for at least 3 hours before serving.

Next time I make this I may increase the amount of pineapple. I think this would also be great in a graham cracker crust..or a chocolate dessert shell.....ok I'll stop!

*Note: if you can't find cream of coconut at your local market try the liquor store or better yet, your local Asian market. The price for a can was 1/2 the price then it was at the grocery store!

Thursday, July 19, 2012

Summer Lovin'

first tomatoes

Summer has grabbed ahold of us and taken us hostage.

Even though, as most of you know, it’s my least favorite season (give me fall year round and I’d be a happy girl), I’m making the best of it. There are things I love about summer, don’t get me wrong.

We harvested our first few tomatoes! Only 4 but it's a start.

We enjoyed a few days off last week. We spent lots of time just being lazy. No set schedule for meals. Feel hungry? Let’s eat. 6pm - wanna popsicle? Ok then. 8pm bowl of cherries. Sure. It was that kinda eating.

We stayed up late (well, late for us anyway) and slept in (that means 7am for us!).

We found this little guy living in the fountain!

Froggy

We picked blueberries – 10 pounds. I then spent 6 hours flash freezing and food vacuuming them. We’ll be happily eating blueberries all winter long.

We harvested our garlic. Nothing makes me happier than going into the garage to grab a bulb that I grew.

First garlic 2012

We had friends and family over for the 4th and hosted a dinner party a few days later. Everything was very relaxed and casual.

My favorite part of my mini vacation – waking up every day, not having to put on makeup and then slipping into a pair of short and a tee.

What I am lovin' right now:

  • Juicy watermelon
  • Popsicles
  • Painted toes
  • Nights by the fire pit
  • Flip flops
  • Cricket chirping
  • Picking blueberries
  • Grilled everything!
  • The warm sun on my skin
  • Watering at dusk
  • Summer thunderstorms
  • Watching my veggies grow
  • Ripe peaches
  • My huge basil patch
  • Burnt marshmallow
  • Cukes sliced straight from the garden
  • Fireflies
  • Sundresses
  • Yard Sales
  • Drippy ice cream cones
  • Cookouts

    What are you lovin' most about summer?

    Monday, July 16, 2012

    Pressed Picnic Sandwich

    Pressed Picnic Sandwich 2

    It's hot here. I know it's the same way for most of the country.

    I’m not complaining. Well, maybe I am complaining a little cause I despise the heat.

    At least we had electricity. I know lots of folks who didn’t have that luxury for quite a while. I cannot imagine going through a heat wave without a fan or air conditioner. I swear I would have just parked myself at the ocean until it cooled down.

    So it’s hot and the last thing you feel like doing is heating up the oven, or some nights, even the stove.

    You need something delicious, but cold.

    Now that the garden is producing cucumbers we'll be having them as a side a lot. The kids don't like cukes. Can you imagine? It's fine with us, with 8 plants we'll be swimming in them this summer, what we don't eat, we share with neighbors and family, so nothing goes to waste.

    Last weekend was humid and muggy which called for a cool meal that didn't require an oven, stove top or even a microwave.

    I picked up a nice ciabatta and filled it with the most delicious cheese and meats, slathered it with pesto and added in fresh basil. Then it went into the fridge overnight to get squished.

    Here it is before the squishing commenced.

    Pressed Picnic Sandwich

    We placed a clipboard on top of it and then a 24 pound weight. That sucker was getting flattened for sure. The next day we took it out, sliced it into thin pieces and enjoyed every chilly bite.

    After squishing.

    Pressed Picnic Sandwich 1

    This would be perfect for a picnic, the beach, or sliced into cubes  held together with a toothpick (which is what I did with the other half of the sandwich). Little bites of deliciousiness!

    Pressed Picnic Sandwich
    recipe from Crepes of Wrath - great site!
    1 large loaf of ciabatta bread, sliced lengthwise
    3-4 tablespoons fresh pesto
    1/4 lb. sliced sweet sopressata
    3-4 slices good prosciutto
    3-4 slices provolone cheese
    3-4 slices mozzarella cheese
    6-8 basil leaves, washed and patted dry
    plastic wrap, for wrapping the sandwiches

    Slice the ciabatta bread lengthwise, so that there is a top and a bottom slice. Spread 3-4 tablespoons of fresh pesto over the bottom piece of bread. I like a lot of pesto, but don’t use so much that the bread becomes soggy.

    Top the pesto with the sopressata, then the provolone, then the prosciutto and mozzarella cheese. Top the cheese with your basil leaves, then place the top of the bread on the sandwich. Press down on the sandwiches with your hands, then very tightly wrap them in plastic wrap (seriously – do this as tight as you possible can). Place the sandwich in the fridge and top with lots of heavy books, a weighted down pot or pan, or whatever other heavy objects you can find. I used 3 very heavy books, then put a 10 pound hand-weight on top of those, and let them sit in the fridge overnight – I did mine for a full 24 hours, but even just 3-4 hours, with plenty of weight applied, will yield beautifully pressed sandwiches.

    When you are ready to eat, unwrap the sandwiches and use a very sharp knife to cut the sandwich into 9-12 small sandwiches, depending on how big you want them to be. I got about 12 sandwiches out of mine, but it also depends on how big your original loaf was. These will keep well after being sliced in an airtight container for up to 2 days – we ate them as leftovers after our party and they were still absolutely delicious.

    Friday, July 6, 2012

    Garlic & Parmesan Pull Apart Bread

    Garlic pull apart

    I hope that those of you in the middle of this awful heatwave are finding a way to cope with this heat. I truly feel for those with no power and a heatwave to contend with. I can only imagine how miserable that must be.

    I don't like the heat and I hate the humidity. It was terribly humid on the 4th but we trudged through. Thank goodness my house is air conditioned so folks could run back inside to cool off for a bit. Having the AC also comes in handy when I want to use the oven. I haven't been doing a whole lot of baking.

    I did turn the oven on a few times though. Once to make this delicious and easy pull apart bread. It was worth the 22 minutes the oven was on. There there was the business of taking a photo.

    There are times when I barely get to take a picture of the food I want to blog about.

    I get groans when I bring a dish outside or into the garage to photograph it. I've even had teenage boys waiting besides me, forks in hand, ready to pounce as soon as I say "I got it". It's true.

    Other times I'll make a separate plate of the dish and photograph after we all eat. That way I get feedback too.

    This was one of those recipes that had them waiting. It smelled so heavenly. They just couldn't wait to dig in.

    There are versions of this floating all over the blogosphere. Don't ask me where I got this one.
    I did adapt the original recipe a bit. Don't I always?

    Garlic pull apart 1

    Garlic Parmesan Pull-Apart Bread
    1 can of refrigerated Grands biscuits (not the flaky layers)
    1/2 stick of butter
    3 cloves of garlic, minced
    1/2 cup grated Parmesan cheese
    1 tsp Italian Seasoning

    Preheat the oven to 350 degrees. Throw the cold stick of butter in a bundt pan and let it melt in the preheating oven.

    While the butter melts, cut the Grands biscuits into quarters. In a bowl, toss the biscuit pieces, garlic, Italian Seasoning, and Parmesan cheese together.

    Once the butter is melted, add the biscuit mixture to the pan, sprinkling with any cheese and garlic that gets let behind in the bowl.

    Bake at 350 degrees for 20- 22 minutes until golden brown. Turn out on a dish and enjoy!

    Tuesday, July 3, 2012

    Happy 4th

    Our yard 2009-9


    There will be lots of good food.


    There will be lots of bare feet.


    There will be firecrackers.


    There will be S'mores by the fire.


    There will be birthday celebrations (hubbies & both my brothers).


    There will be lots of laughs with friends and family.


    There will a whole lotta relaxing to follow.


    Happy 4th of July!