Friday, December 30, 2011

Sausage Rolls

Sausage Rolls1

Guess what I got for Christmas?

A head cold. Way to go Santa.

I've been just miserably sick, but the show must go on right? So I managed to cook everything I had to for Christmas Eve. I actually had to stop and take a few breaks in between. I was that sick.

We had a perfectly nice little Christmas even though I slept through a lot of it.

Now we're on to New Years Eve. I'm starting to feel better, so by Saturday I hope to be happily cooking in the kitchen without taking too many breaks.

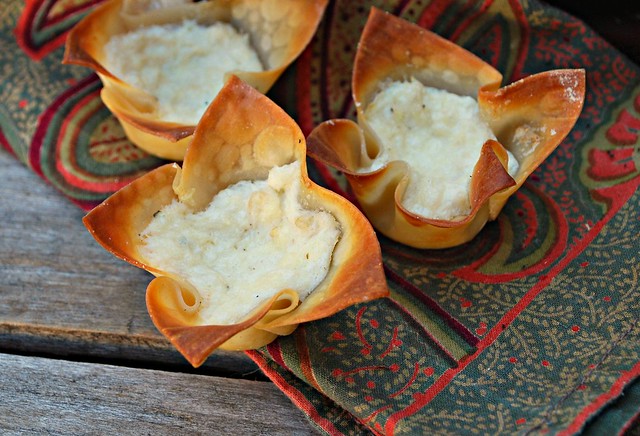
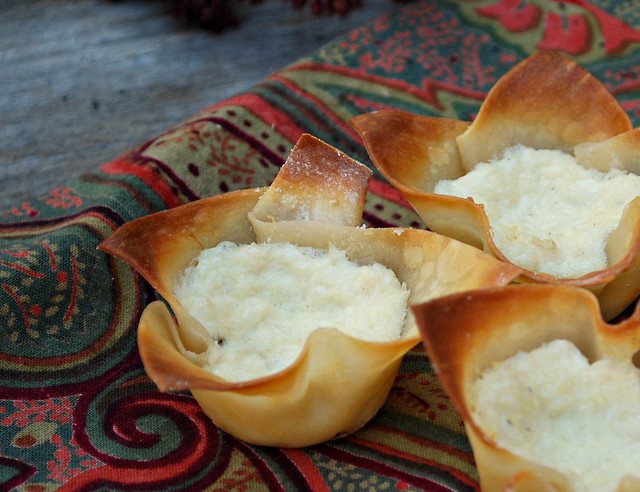
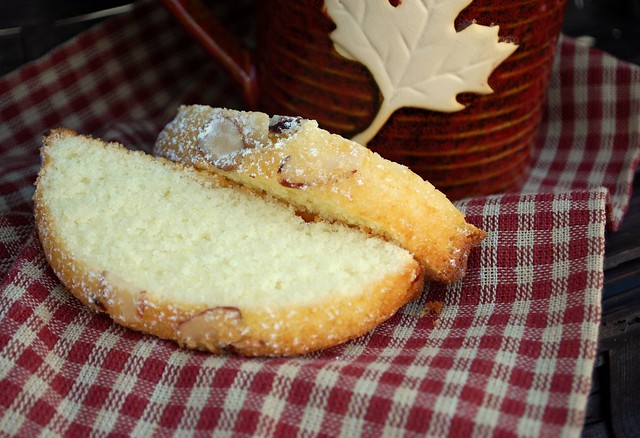
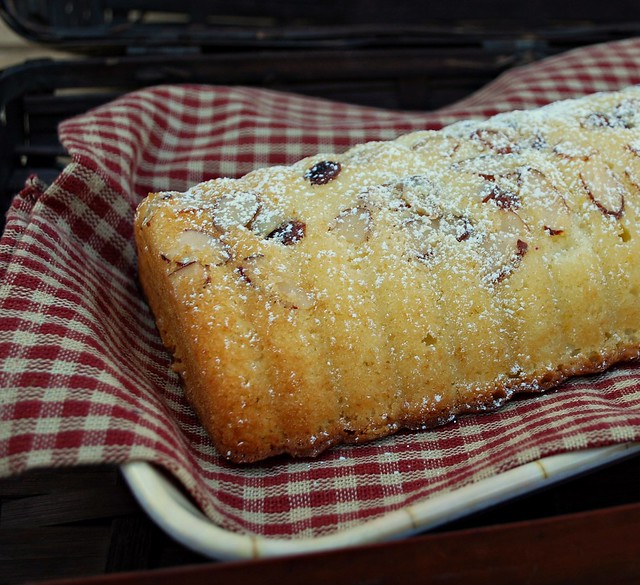
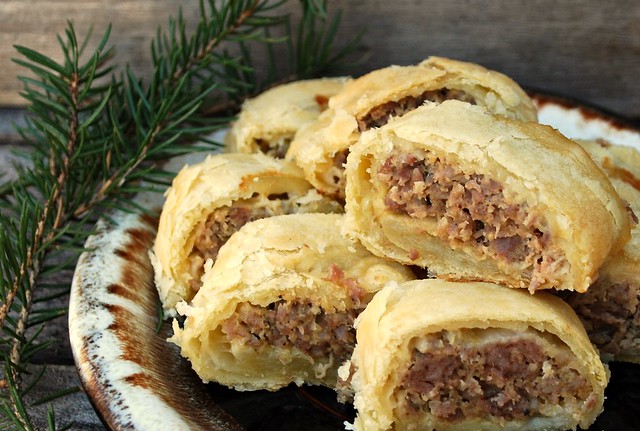
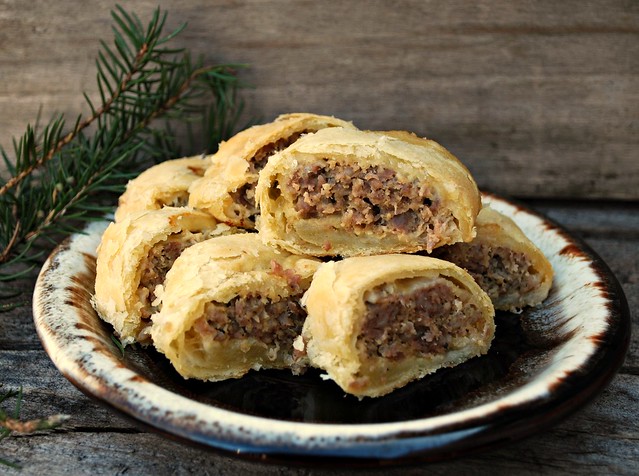
I made these Sausage Rolls for Christmas Eve. They were a big hit. I had looked up several recipes online and finally decided to just make up my own.

I baked these off the day before, refrigerated them, then sliced and re-heated for Christmas Eve. If your going to be serving them straight out of the oven, I would let them sit for 15 minutes before slicing.

Oh one more thing...HAPPY NEW YEAR!

We're hosting a house party (what a shock!) with a few close friends. Hopefully the bunch of us geezers can actually stay up till midnight!

Sausage Rolls

Sausage Rolls

recipe from Lisa@The Cutting Edge or Ordinary
1 package frozen puff pastry, thawed
1 pound pork sausage
1 teaspoon Mrs. Dash or seasoning of your choice
1 teaspoon Dijon mustard
2 eggs, divided

Preheat the oven to 400. Line a baking sheet with parchment paper.

On a lightly floured surface, roll out one sheet of the puff pastry. You just want it a bit bigger than it is when it comes out of the package, approximately 12 inches or so. Now fold the dough and cut it in half so you have two pieces. Do the same with the remaining sheet of pastry.

Combine the sausage, seasoning, mustard and 1 egg in a bowl. Mix together.

Mix the other egg in a small bowl with about a teaspoon of water. Brush all four edges of the puff pastry. Divide the sausage into four equal amounts. I just eyed it. Take one fourth and form a long sausage like shape down the middle of the dough, starting and ending a 1/2 inch from the ends. Fold one side, then the other up over the sausage. Pinch the edges to seal. Place on lined sheet and brush with egg wash. Repeat 3 more times with remaining pastry.

With a sharp knife slice several slits into the top of the pastry. Bake for 20 to 25 minutes or until puffy and golden brown. Allow to cool 15 minutes, then slice into pieces to serve.

Thursday, December 22, 2011

Turtle Candies & a Christmas wish~

Turtle candy

Turtle Candy is John's favorite.

Maybe it's because he grew up in New Mexico and he misses the fresh pecans.

Maybe because there is caramel. I rest my case when it comes to caramel.

Then there's chocolate. My fave.

Top it all off with a sprinkle of course salt and you have perfection in a single bite.

The only bummer about this recipe.....pecans are very expensive in Rhode Island! In New Mexico they were dirt cheap. In Rhode Island they are not, but I made them anyway cause heck it's Christmas and what other time of year are ya gonna splurge on a nut right?

Turtle candy 1

Turtle Candies

recipe from She Wears Many Hats
4 cups pecan pieces
14 oz caramels (I used the bag of bits, no unwrapping!)
10 oz. chocolate chips
coarse salt for sprinkling

Preheat oven to 250°F. Lightly salt pecans and toast on baking sheet for about 25-30 minutes.
While pecans are toasting, melt caramels according to package directions. I melted them in the microwave and it was just fine and dandy.

Mix toasted pecans into melted caramels. Slightly cool, so you can handle. Drop tablespoon size rounds onto buttered or lined baking sheet. If mixture begins to harden, reheat for a few seconds at a time in the microwave. Let cool.

Melt chocolate chips according to package directions. Again, the microwave worked like a charm. Top each caramel/pecan drop with about 1 tablespoon of chocolate, and sprinkle with a little bit of salt. Let cool.
Store in airtight container. Makes about 4 dozen.

___________________________________________________________________________

This will probably be my last post until after Christmas. 


Like many of you, I have lots of work to do in the kitchen over the next few days. I'm looking forward to a house full of family and good food. Christmas just makes me feel all warm and fuzzy inside and I plan on making that feeling last as long as possible.

To all my faithful blog follows... I wish you a very Merry Christmas. I hope it's filled with everything you love!

Merry Christmas from us all,
John, Lisa, Jesse, Evan & Moose!

Wednesday, December 21, 2011

My Favorite Things

Christmas 20110 25


I have to tell you all something. I did something a few weekends ago. Something that was very hard for me to do. I purged a lot of my Christmas decorations.

I promised myself last year that I was going to simplify my holidays and I did, but I fell short last year when it came to the decoration department.

I had 6 big Rubbermaid bins filled with decorations. That’s not including the stuff that didn’t fit into the bins. Yikes! It was outta control.

About 8 years ago I did a radical purge. 8 years later things started to accumulate again. Hence this purge. I remember putting at least 3 bins full of stuff I wasn’t going to use back up in the attic last year. Why was I holding on to stuff I didn’t even display in my house?

I started asking myself….do I really need all this stuff? Can I just hold on to the pieces I love? The ones that make smile when I uncover them each December. The ones that mean so much to me?

It was hard, but I did it and I really feel alot better about it.

Some of my favorite tree ornaments.

Christmas 2011

Christmas 2011 1

Christmas 2011 2

Christmas 2011 3

Little bits from around the house.

Christmas 20110 4

Christmas 20110 23

Christmas 20110 21

Christmas 20110 19

Christmas 20110 18

Christmas 20110 16

Christmas 20110 12

Christmas 20110 11

Christmas 20110 10

The little stockings I made last year.

Christmas 20110 8

One of my favorite Santa's given to me by my Uncle Al and Aunt Claire. I think of them every time I see him.

Christmas 20110 7

Christmas 20110 5

I hope your home is filled with the things and more importantly, the people you love this holiday season.

Monday, December 19, 2011

Baked Crab Rangoon

Baked Crab Rangoon Cups

Need a quick and easy appetizer for Christmas? Here it is.

Baked Crab Rangoons.

I love crab rangoon! Don't you?

Oh I forgot there are a few of you who don't like seafood, so this recipe probably doesn't do it for you. Sorry seafood haters (or those of you with an allergy). Lord, I couldn't imagine living in the ocean state with a seafood allergy. Must be horrible!

So for those of you who are with me let me say "I love seafood!" I don't think there is a seafood I don't like. Mussels, clams, shrimp, oysters, all the fishies (although blue fish can be a bit too fishy for me sometimes), I could just live on the stuff and luckily I live in a state where the fish is plentiful and reasonably priced. Even Christmas is all about the seafood here. I'm so lucky to be born into a Sicilian family, cause that means 7 fishes on Christmas Eve!

My oldest son isn't really a seafood lover. He picks at a few things. My youngest is about the same, but they will both eat Crab Rangoon. It's got to be one of the most popular dishes on the menu at your local Chinese place I would assume right?

Baked Crab Rangoon Cups2

Those little bundles of joy that you order from your local take-out...they got nuttin' on these babies. Crunchy on the outside and creamy crabby on the inside.

Baked Crab Rangoon
Adapted from a recipe at My Baking Addiction
1 can (6oz) white crabmeat, drained and chopped
4 oz cream cheese, softened (I used only 3 oz)
2 tablespoons mayo
½ teaspoon Sriracha (optional)
2 teaspoons finely chopped chives
Ground pepper to taste
12 wonton wrapper


Oven to 350. Spray a MINI muffin pan with nonstick spray. 


Combine all the ingredients in a medium bowl. Mix until combined.

Place a wonton wrapper in the muffin cups. Push the wrapper down into the pan so it fits snugly in the bottom. Fill with about a teaspoon of the mixture.


Bake 15 to 20 minutes, or until edges are golden and crisp and filling is heated through. Garnish with extra chives if you’d like.

Tuesday, December 13, 2011

Samoa Bark

Samoa Bark

Who doesn't love at least one kind of Girl Scout cookie? I know everyone has their favorite, mine are the Samoa. I'm a caramel lover, so any time I see caramel in a recipe, I'm in.

I heard that the Girl Scouts changed the name to Caramel DeLites, but they will always be Samoas to me.

Since cookie time with the scouts only comes once I year, sometimes we have to make due and make a copycat recipe to hold us over through the rest of the year.

I found this recipe on Cookies & Cups.  I pretty much followed it as written, except I used parchment on the bottom and I spread my chocolate base out just a smidge less.

Samo Bark 1

I used Lorna Doone cookies. Man are they expensive! I couldn't believe they were almost $4 for a little box.

That particular cookie holds a special place in my heart. I always think of my Papa, my great-grandfather Bertie when I see Lorna Doones. He always had a package in the bottom drawer at his house. I remember lots of afternoons sitting and eating Lorna Doones with our afternoon tea.

You can use any kind of shortbread cookie you can find. I know Walker makes a great shortbread cookie too.

Samoa Bark
12 ounces semi-sweet chocolate (plus more for drizzle)
35- 40 shortbread cookies (I used Lorna Doone)
14oz  bag of caramels (I used the bits, no unwrapping!)
3 ups sweetened flaked coconut
1 tablespoons water

Line a baking pan with foil (I used parchment). Set aside.

Melt 12 ounces of semi-sweet chocolate. You can use a double boiler or the microwave. Spread the melted chocolate on the foil or parchment. I didn't go to the edge of the pan. I wanted it a bit thicker. Top the warm chocolate with shortbread cookies. Place sheet in the freezer while you prep the next stages.

In a non-stick skillet on medium-low, toast your coconut, stirring occasionally. This will take about 10 minutes. DON'T WALK AWAY FROM THE STOVE. You need to watch the coconut. It can go from browned to burn in seconds. Set aside.

Place your caramel and the water in a pan and heat over medium-low heat. Stir continuously until the caramel has melted. Immediately fold in your toasted coconut. Remove your chocolate from the freezer and spread it evenly over the tops. Melt a bit more chocolate and drizzle over the top. Place in freezer or fridge to set. Cut into bars and enjoy!

Friday, December 9, 2011

Winter birds 4

Happy Friday everyone.

Don't let the picture mislead you. It's not snowing here (although I wish it was). Just an older photo of one of my beloved birds from last year. I'm happy to see them all back at their feeders again.

No recipe today. Just checking in.

We have the day off today so we are off for a little shopping (no presents, we are so done Christmas shopping!).

I do have some great recipes coming up like:

Deep Dish Pizza Casserole
Baked Crab Rangoon
Samoa Bark - if you love the Girls Scout cookies you will flip over these!
Make-ahead Unstuffed Shells

I've made them....I photographed them.....we've eaten them....now I just have to find time to sit down and post them! They are on the way, I promise.

Enjoy your weekend!

Monday, December 5, 2011

Cinnamon Honey Butter

Cinnamon Honey Butter3

Happy Monday all. Yes it's the start of another busy week.

My head is churning (ha a butter pun!) with menus and recipes and idea for Christmas Eve dinner. I've pretty much had my menu planned for awhile now, but I keep coming across great recipes in my cooking magazines and they some how get added to the menu so it's still somewhat of a work in progress.  In the mean time life still goes on and I still have 3 hungry guys to feed each week and feeding them does include breakfast. No I'm not getting up and making bacon and eggs, but I do like them to start the day off with something in their bellies. For the kids that usually means cereal, bagels, waffles or toast. I love toast.

Are you a toast lover like me?

I'll eat just about any kind of bread toasted, although I'm not a huge fan of pumpernickel or rye. Just about all other kinds will do.

I love jam on toast, plain butter, jellies, and of course cinnamon sugar. Trader Joe's Fig Butter is one of my absolute my favorite things to slather on bread, but this comes in a close second.

Evan was cinnamon toast addicted as a toddler. I can't even estimate how many slices I made for him growing up. I'm sure I hit the thousands at least.

Cinnamon Honey Butter1


Why didn't I think to do this sooner?

I searched the web for cinnamon sugar butter recipes and I did find a few, but in the end, I experimented and mixed up a batch with the right balance for us. I used honey instead of sugar. I couldn't imagine the gritty sugar mixing in with the butter.

This was the perfect combination and just the right amount.


Cinnamon Honey Butter
1 cup butter
1/2 c honey
1 teaspoon cinnamon


You can keep this in the fridge but you'll need to take it out about a half our before you want to use it to make it spreadable.

Friday, December 2, 2011

Mini Cheesy Biscuits (No Knead!)

Mini Cheesy Biscuits1

Hello! How are things in your little world?

Have you got out your Christmas decorations yet? Put the tree up? Bought gifts? Crafted anything special?

I'm not trying to pressure you, just asking how things are going is all.

We are getting our tree this weekend. We get ours from a little family run tree farm right around the corner from us. Just about all my presents are bought...just need to get wrappin' now and I'm just about done with my crafting too. Working on finishing touches and such.

December is cooking and baking time in our house. I don't want the pressure of going to any stores or fighting traffic. I vowed last year to make all our Christmases from here on out more simple and homemade and I'm stickin' to my guns on that one.

One of the things I love most about this time of year is all the great things that come out of my oven. I found this recipe on Plain Chicken.com. Steph has a lot of really great recipes. This one caught my interest. This was titled Jim 'n Nicks Cheesy Biscuits. I have no idea who Jim or Nick are. Maybe it's a restaurant in another part of the US? Regardless...they make a delicious biscuit (vanilla excluded here though).

Little mini cheesy biscuits that are no knead! No knead! You can thank me later.

These took like 3 minutes to put together and 15 minutes to cook. My teenage boys were eating them faster than I could make them. So good!

The original recipe called for 1 teaspoon of vanilla. I omitted it and I cut down on the sugar a bit too.

They really came out great.

Mini Cheesy Biscuits

Cheesy Biscuits (No Knead!)
adapted from a recipe at plainchicken.com
1 ½ cups Bisquick
¾ cup buttermilk
2 tablespoons sugar
1 cup cheddar cheese, shredded

Preheat oven to 425. Stir together all the ingredients until just combined. Don’t over mix! Scoop into greased mini muffin pan. Bake at 425 for 12 – 15 minutes or until golden.

Monday, November 28, 2011

Special Sauce

Special Sauce

When I was a teenager, my friend Kathy and I would make this dip that we used to dunk our potato chips in. It was equal parts of ketchup and mayo mixed together. We thought we were culinary geniuses, really we did.

It was our special dip.

We also had another specialty....white rice and butter. Yea we were rebels in the kitchen I tell ya, but we were young and hungry so we did what we had to do. Most of the time we'd sleep over her Meme's house. While Meme was out line dancing with her friends, we'd call boys on the phone, write elaborate stories, listen to music and make white rice and dip.

Just a few months ago that dip popped into my head and I was telling my youngest son about it. He wanted to make it, so we did.   It was a hit. He happily dipped chips into it and it really brought back a flood of memories for me. I told Kathy about it via Facebook and I think it brought back from memories for her too.

When I saw this recipe for Special Sauce, I just knew I had to make. My oldest son is a mayo and ketchup freak, so I knew this sauce would be something he would love.

I omitted the adobo sauce, cause as we all know, I am a wimp when it comes to heat. If you're not a wimp like me, please leave it in!

Special Sauce1

This is really like a thousand island dressing, but just a little better. We're already dunking everything in it.

Special Sauce
½ cup mayonnaise
2 tablespoons ketchup
1 tablespoon finely grated onion
1 tablespoon sweet or dill pickle relish
2 teaspoons adobo sauce from canned chipotle chilies in adobo
1/8 teaspoon celery salt
1/8 teaspoon kosher salt.

Combine all ingredients and serve on burgers or whatever you like!

Thursday, November 24, 2011

For each new morning with its light,
For rest and shelter of the night,
For health and food, love and friends,
For Everything thy goodness sends.


~ Ralph Waldo Emerson


thanks1

Tuesday, November 22, 2011

Winners!


Thanks to everyone who entered!
Here are the winners!

Angelica and Karie@The Hob!

Congrats ladies! Please use the contact me button off to the left to send me your address!

Wednesday, November 16, 2011

Swedish Almond Cake & a Giveaway or two!

Swedish Almond Cake 2jpg


This recipe is from my friend Ken's Mom, Marion.

I first time I had this cake was probably more than 15 years ago.

You do need a special pan to bake it, which is why I had never blogged it before until now, but this cake is too good not to share. Marion is Swedish, so this is the real thing people. I just love it. It's one of my most favorite cakes. It's not fluffy or frosted, it doesn't have a page full of ingredients, it's just simple good cake with a fantastic almond flavor.

The pan I bake this in is called a Half Roll Bake pan. My friend Eva (Ken's wife) bought me ones ages ago. Mine is marked on the bottom "Made in West Germany". Huh? Doesn't sound too Swedish to me!

Swedish Almond Cake 1jpg

I had never seen another pan like it until last week so I picked up 2 to give away, cause I think a few more people should be able to experience this delicious cake.

Here's the recipe. Scroll down for the giveaway(s)

Swedish Almond Cake
recipe from Marion Bird
Spray a half roll pan with Bakers Joy or use cooking spray. I like Bakers Joy cause the cake never sticks.

In a large bowl beat:
1 1/4 cups sugar
1 egg
1 1/2 teaspoons PURE almond extract (Imitation just won't do in this recipe)
2/3 cup milk

Beat until combined. Then add in:
1 1/4 cups all purpose flour
1/2 teaspoon baking powder

Again, beat until combined, scrapping up any flour that sticks to the side of the bowl.

Finally add in:
1 stick melted butter.

Mix again.

If you'd like the top to be almond covered (I think it looks pretty) then sprinkle some slivered almonds into the bottom of the pan. Pour in the batter and carefully smooth the top. Bake at 350 for 40 - 50 minutes of until the edges are nicely browned and the cake tests done. It will puff up over the top of the pan, don't worry.

Cool completely in the pan. If you don't, the cake will break while you are trying to get it out.

Invert onto a plate, sprinkle with powered sugar and serve!
_______________________________________________________________________________
The Giveaways!

So since the baking season is upon us, I put together 2 baking gifts for you to win. Both contain the same items, but one also includes a 9 cup brownie pan. You get 9 perfect little individual brownies from one pan. Pretty cool huh?
So what up for grabs?

  • The half roll bake pan
  • Wilton green & white sparkling sugar
  • Trader Joe's (Baker Joe's in this case) Cocoa Pearls
  • Cupcake Plunger - you can easily make filled cupcakes or muffins.


    giveaway Here's all the loot! Remember one person will win what is pictured above. Another will be chosen for the additional items. So here's the brownie pan..... giveaway3 And here is the half roll pan..... giveaway 4 The A cupcake plunger. I picked one up for myself. I need to get plunging! giveaway2 
     And lastly, the Wilton sprinkles and Cocoa pearls. giveaway 1 
     TO ENTER: Leave me a comment answering this question....... 
    What is your favorite holiday cookie?
    Please, please, please, I can't stress this enough.....LEAVE AN EMAIL ADDRESS if you don't have a blog. If you don't leave an address, then I 'll just pick another winner, so please don't forget! 2 winner will be drawn on Monday, November 21st! If you're a follower, let me know and I'll throw in another chance for you! Good Luck!

Monday, November 14, 2011

How to roast garlic. Simple and easy.

Garlic 1

I grow my own garlic every year.

After is harvested in the fall, it hangs from one of the rafters in the garage.

I love that I can grab a pair of scissors and just snip away at whatever I need.

We are a garlic lovin' family. Some people might think I love it a little too much. I can go overboard with it at times.

I remember saying to John one day that I was so happy that he loved it to cause I honestly don't think I could have married anyone who didn't like it. I would have to compromise my cooking too much. I really can't live without it. No joke.

So we have a lot of garlic, and we use it all the time.

One of my favorite ways is to roast it. Roasting garlic makes it so creamy and nutty that you will be tempted to hold a whole head over your mouth and just squeeze out every clove directly into your pie hole (or garlic hole in this case). Wait, maybe that's just me?

Anyway roasting garlic is super easy and so delicious. If you've never done it....YOU NEED TO!

Here's how I do it.

Get one or two heads of garlic. Try and pick heads that are on the larger size. I always roast at least two at a time.

Pull away the outer papery layers. Don't peel them completely. You want the cloves inside to say together. Then chop off a quarter of a section with a sharp knife. You want to cut off just the tips of the cloves.

Garlic 2

Then get a double layer of foil and place the garlic in the middle. You want enough foil to wrap it up tightly. Now drizzle each clove with olive oil.

Garlic 3

Wrap the heads up and seal the foil tightly.

Garlic 4

I use my toaster oven to roast my garlic. You certainly can use your oven. Heat to 400 and roast for 35 - 45 minutes. Times vary depending on how big your garlic is. Mine are very large.

Open the foil up carefully in case there is some steam trapped inside. Now poke it with a knife to see if the cloves are all mushy and creamy. If they are...CONGRATS...you just successfully roasted garlic, if they aren't stick them back in for a few more minutes.

Garlic 5

Once you can handle the garlic, just squeeze out the cloves. You just spread it on bread, you can add it to soups, heck there really are endless uses for it.

One of our favorite ways to eat it is as a dipping sauce. We heat up some good olive oil on low in a sauce pan loaded with cloves. As soon as the oil is warm, we pour it into dipping bowls. Grab a hunk of bread and start dipping.

It's one of my favorite ways to eat it.

Now go make some roasted garlic!

Friday, November 11, 2011

Almond Joy Brownie Bites

Almond Joy Brownie Bites

I know Halloween just past.

I know Thanksgiving is just around the corner. Yeah!

I realize that some of you may even have candy leftover! How'd you manage that? Oh the willpower you must have!

Well we are plumb outta candy at our house. With teenage boys, and teenage boys friends visiting our candy bowl is pretty near empty. Whoppers and black licorice seem to be the last to go.

In homage to my favorite candy bar the Almond Joy, I give you Almond Joy Brownie Bite.

Brownie base, crunchy coconut topping, melted chocolate and almonds.

These little suckers are filling and this recipe makes 24 of them. A recipe with lots to share. I like that.

Almond Joy Brownie Bites
Makes 24
Adapted from a recipe at Flour Me with Love
1 box (family size) chocolate fudge brownie mix, plus ingredients for making
1 (14oz) can sweetened condensed milk
1 (14oz) bag coconut
¼ cup milk
1 teaspoon vanilla extract
1 cup chocolate chips
¼ cup crushed almonds

Oven to 350.

Line a cupcake pan with paper liners. Don’t skip this step!

Prepare the brownies according to the package directions. Pour the batter ½ way up the cupcake liners. Bake for 12 minutes.

While the brownies are baking, mix the coconut, sweetened condensed milk, milk & vanilla extract together.

Remove the brownies from the oven and spoon on about a teaspoon full of the sweetened coconut. Return to the oven for an additional 14 – 16 minutes.

Remove and allow to cool completely. Melt the chocolate chips on low power in the microwave for 1 - 2 minutes. Stirring every 30 seconds. Drizzle on the chocolate and top with chopped almonds.

Almond Joy Brownie Bites 2

Friday, November 4, 2011

Pumpkin Crunch Cake

Pumpkin Crunch Cake 1


Did you hear that there is supposed to be a pumpkin storage this year?
There was talk about it, but when I went to the store, I saw plenty of pumpkin on the shelves. I do a lot of my shopping at BJ’s Wholesale Club, and they sell pumpkin by the 3 pack. I bought two three packs. Then I went to the grocery store and I saw the 15oz size cans of pumpkin for under a dollar, so I bought 3 more. I’m so ready for all things pumpkin.

I found this cake on my beloved Pinterest. It’s also called a “dump cake” because basically you are throwing everything in the dish and baking it. I think crunch cake sounds nicer than dump cake don’t you?

If you like pumpkin pie with a crunchy topping, this is a dessert for you. The bottom layer is like creamy pumpkin pie, and the top layer is nutty and crunchy. I used spice cake for this recipe, but yellow, butter or even white would work too.

It literally took minutes to throw together.

Pumpkin Crunch Cake 3

Pumpkin Crunch Cake
15 oz can pumpkin; or 2 cups fresh pumpkin puree
1-12 oz can evaporated milk
1 1/2 cups sugar
3 eggs
1 teaspoon cinnamon
1 box cake mix (I used spice cake, but yellow, butter or white would work too)
1 cup melted butter (yup that’s 2 sticks)
1 cup chopped walnuts or pecans (optional)

Mix the pumpkin, evaporated milk, sugar, eggs, and cinnamon.

Spread mixture evenly in a lightly greased 9 x 13 baking pan.

Sprinkle dry cake mix evenly over pumpkin mixture. Sprinkle the nuts over the top of the cake mix. Pour the melted butter evenly over the top of everything. Do not stir.

Bake at 350 degrees for 50 to 60 minutes or until top is browned. Let cool before serving. Refrigerate leftovers.