Tuesday, April 28, 2009

Outrageous Chocolate Cookies

CCC Cookies dunk

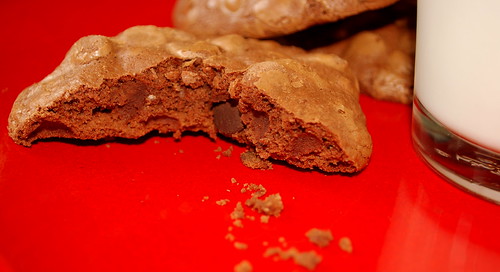
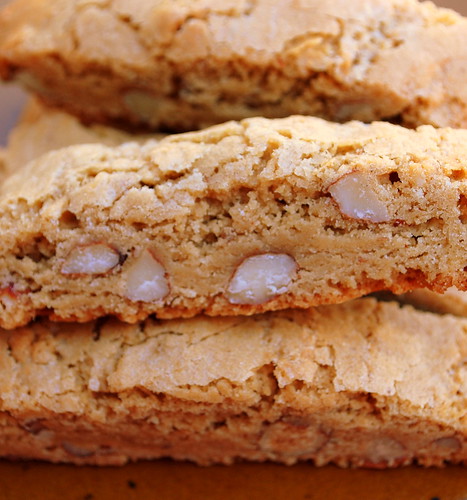
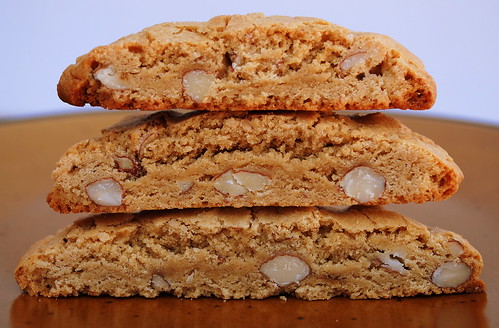
Sometimes you just need a dunkable cookie.
One you can submerge into a tall glass of milk and crunch and slurp all at the same time.

Friday night I felt like baking. I knew the weekend was going to be warm and since the air conditioners aren't in the windows yet, I figured I'd better use the oven while it was still on the cool side.

Since the weekends here are usually filled with kids, I wanted to make something they could grab and go with. All the kids who trudge through my house anticipate there being some sort of baked goodie around. I can't let them down now can I?

Jesse is a great dunker. Ever since he was a little boy, he would try and dunk every cookie I gave. Over the years he's learned that some cookies just aren't dunkable. Not the case with these. Even though they are chewy on the inside, the outsides are crisp enough to hold up to the milk.


CCC plate

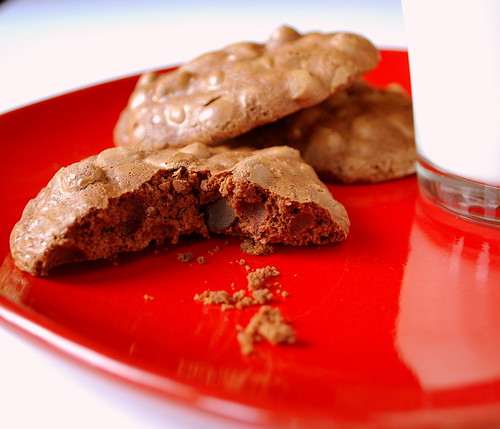
Outrageous Chocolate Cookies - recipe from Martha
(you know what Martha)
Printable recipe
8 ounces semisweet chocolate, roughly chopped
4 tablespoons unsalted butter
2/3 cup all purpose flour, spooned and leveled
1/2 teaspoon baking powder
1/2 teaspoons salt
2 large eggs
3/4 cup packed light brown sugar
1 teaspoon vanilla
1 package (12 ounces) semisweet chocolate chunks (I used chips)

Preheat oven to 350. Heat the 8 ounces of chopped chocolate and butter in the microwave at 20 second increments, stirring in between, until almost melted. Do not overheat! In another bowl, whisk together the flour, baking powder and salt.

In a mixing bowl, beat the eggs, brown sugar and vanilla on high speed until light and fluffy, about 4 minutes. Reduce the speed to low and beat in the melted chocolate. Mix the flour mixture until just combined. Stir in the chocolate chunks (or chips).

The batter seemed a little soupy at this point. I let it sit until it thickened up a bit. Drop heaping tablespoons of dough 2 to 3 inches apart onto baking sheets. Bake, rotating sheets halfway through, until the cookies are shiny and crackly, yet soft in the center, 12 to 15 minutes. Cool on sheets 10 minutes (I only waited 5), with a thin metal spatula, transfer to racks to cool completely.

CCC CU

Sunday, April 26, 2009

Work and play and some perfect days.

Perfect.

That was the word that described this weekend. The weather here in Rhode Island was in the mid 80's.
Unheard of for this time of year.

We spent twelve hours in the yard on Saturday. Twelve, but they were a good twelve hours, filled with work and play. We're feeling satisfied with all the improvements we've made and are looking forward to planting and watching our veggies and flowers grow.
We had a bunch of kids around (as always) and they went on scooter rides, layed in the sunshine and made smores by the fire at night.

There was tree climbing.

Evan Tree


Nest finding.

Bird Nest


Deck Staining.


Deck Staining


Bench making.

Benches


Smokin' and Jokin'...

Smokin and Jokin


..and a night by the fire. The kids made smores but had more fun burning the sticks than anything else.

Fire Pit guys1


Evan was "writing" in the air with his stick. He must have been making an O when I snapped this picture.


Fire Pit kids

We talked and laughed, listened to the kids having fun, and rested our bodies from the long day of work.


Fire Pit guys


A very good weekend indeed.

Jesse Fire Pit

Friday, April 24, 2009

Turkey Meatballs

Turkey meatballs CU

Since the weather here is going to in the high 80’s this weekend (yes you read that right, high 80’s in Rhode Island, in April, who would have thunk it?) I planned ahead and made up a big batch of turkey meatballs earlier in the week. What I like about this recipe is that it makes a lot, around 40, and I can use half and freeze half for another meal, or just freeze them in two batches.

We have lots more to do in the yard, so if I don’t feel like cooking, I can just de-frost some meatballs and make grinders* with them. (*grinders are the RI name for subs, hoagies, whatever you call them in your neck of the woods).

I simmered these in tomato sauce and served them with rigatoni earlier in the week. One of Evan’s friends was eating over and this was the conversation at the table.

Evan: “Those are turkey meatballs you know”

Friend: (holding the meatball up and inspecting it) “No suh”

Evan: “Yes suh”

Friend: “Really?”

Evan: “Really”

Friend: “They taste just like the real ones”

Evan: “That’s cause my Mom makes them”

Friend to me: “You made these??”

Me: “Yes”

Friend: “Wow". (short pause) "My Mom makes meatballs too”

Me: (In my best June Cleaver voice) “Well isn’t that nice”

Friend: “Well they come out of a bag”

Ok then. Moving along. The conversation kinda stopped there. Evan was shocked that meatballs come in a bag.

My kids are totally culinarially spoiled (yes I know that's not a real word).

Turkey meatballs


Lisa's Turkey Meatballs
Printable recipe
3 pounds ground turkey meat
1 small red onion, grated or very finely chopped
4 – 5 cloves of garlic, crushed
1 ½ cups Panko breadcrumbs
1 cup Italian seasoned breadcrumbs
3 large eggs
½ cup milk
1 cup grated Romano cheese
1/3 cup fresh chopped parsley
1/3 cup freshly chopped basil
1 tablespoon Italian seasoning
salt/pepper to taste

Preheat the oven to 350. Combine all the ingredients into a large bowl.

Mix all the ingredients together. Just get in there with clean hands and start mixing. Try not to over mix. Just get all the ingredients combined and stop. If the mixture seems a little to loose, add some more breadcrumbs, if it seems a bit too dry, add a little more milk. It’s really a texture thing. You don’t want them to feel dry, but you also don’t want them to feel too wet either.

Roll them loosely into the size of golf balls and place them on a foil or parchment lined baking sheet. This recipe makes about 40 meatballs. I usually put 20 meatballs on each tray and half way through the baking time, I rotate them from top to bottom and bottom to top. Bake for approximately 40 minutes.

Tuesday, April 21, 2009

Chocolate Chip Cream Cheese Squares

CC Cream Cheese Square

I pulled this recipe out of one of those Kraft Food & Family magazines a few years ago. I have been receiving this free magazine for quite a few years and I really enjoyed scanning it for recipes and ideas. My last issue arrived and out fell an invoice?? Hmmm. An invoice in the magazine that I have been receiving for free all these years? Can’t be. Can it? Oh but it was. Seem even the people at Kraft are feeling the effect of this economic downturn and now would like us to pay for the normally free publication. Rats. I’m torn. I already subscribe to Gourmet, Bon Appetite, Saveur, Everyday Food, Taste of Home, Yankee (yup there’s recipes in dem dar magazeens), and another magazine that I just got a sample copy of whose name escapes me at the moment, but it was nice! Really, even though I can't for the life of me remember the name. (I cancelled Cook’s Illustrated, got bored with the 6 page recipes and black & white hand drawings. I need big glossy colored photos people. I am a visual person, and black & white hand drawings just don’t cut it with me, plus their were mean to some nice people I know, so that’s enough for me to kick them to the curb).

So whether or not I decided to subscribe to the Kraft magazine, I have to say I have scoffed quite a few crowd-pleasing recipes from it over the years.

Now back to the food. Do you like cheese danish? Cause if you do, then do I have a dessert for you. This dessert reminds me of a great, creamy cheese danish and the best part about it is, you can throw his puppy together in just a few minutes.

I varied the original recipe (imagine that) and added the mini chocolate chips in. You could also add a bit of flavoring into the cream cheese if you’d like…orange, lemon, almond, etc. These squares are very versatile. You could also mix in some fruit, nuts, etc. Experiment and see what you can come up with.

I also cut down on the amount of topping it called for. Originally it was a ¼ cup and 2 tablespoons of cinnamon. I found that to be just way too much. The 1/8 of a cup and 1 tablespoon tastes much better. Just make sure you sprinkle the topping on as soon as it comes out of the oven so it can melt into the squares.

CC Cream Cheese Square1


Chocolate Chip Cream Cheese Squares
Printable recipe
2 cans (8oz each) refrigerated crescent dinner rolls or 2 cans of the Recipe Creations crescent rolls
2 pkgs (8oz each) cream cheese, softened
1 tsp vanilla
1 egg, lightly beaten
½ cup sugar
1/2 cup mini chocolate chips

Topping:
1/8 cup sugar
1 1/2 tablespoons cinnamon

Preheat the oven to 350. Unroll 1 of the cans of crescent rolls and press it into the bottom of a 9x13 inch-baking pan to form a crust. If you are using the dinner rolls, make sure to firmly press the seams together.

Beat cream cheese, vanilla, egg and ½ cup sugar with an electric mixer on medium speed until well blended. Stir in one cup of semi-sweet chocolate chips.

Unroll remaining can of crescent dough onto a large sheet of wax paper. Pat out the dough to form a 9x13 rectangle, pressing the seams together to seal. Invert over the cream cheese mixture to form the top crust.

Bake 30 – 35 minutes or until light golden brown.

For topping: Combine the sugar and cinnamon into a small bowl and sprinkle over the squares as soon as they come out of the oven.

Saturday, April 18, 2009

Mom's Almond Slices

Almond Slices CU


These are my Mom's Almond Slice cookies. If you have ever been the recipient of an Italian Cookie tray, or been into an Italian bakery, you have seen one of these cookies, maybe you've even tried one, and if you have, I can tell you right now that it wasn't nearly as delicious as my Mom's.

Almond Slices stacked


She's been making these for as long as I can remember. Her Italian cookie line up goes like this:

Wine biscuits
Pepper biscuits
Egg biscuits
Fig Cookies
Almond Slices

Out of that list, the only cookies I will eat are the last two. It's not that others aren't wonderful. They are some of her most requested cookies, I just don't like them. I adore the Almond Slices.

These are kind of like a softer version of a biscotti, chewy and crunchy at the same time. (Think crunchy chocolate chip cookie with chewy center). Make sure to check them before you take them out of the oven for the final time. They should be crunchy on top but moist in the center. They will continue to cook after you take them out of the oven, so just let them set. Make sure to cool completely before you slice them.

Mom's Almond Slices
Printable recipe
In a large bowl mix:
1 cup sugar
1 cup brown sugar
½ cup vegetable oil
2 tablespoons water
2 eggs

Mix together:
2 ½ cups flour
2 teaspoons baking powder

Add to the previous ingredients.

Mix to combine and stir in 2 cups sliced almonds. Roll into 2 logs about 10 inches long, and wrap in plastic wrap. Refrigerate a minimum of 1 hour. (It’s really best to refrigerate the dough overnight).

Place on a cookie sheet and bake for 20 - 30 minutes at 350. You need to go on feel here, so times vary. Feel them to see if they are too squishy, if they are put them back into the oven for 5-minute intervals. They should feel slightly hard.

Let them cool completely before you cut them into slices.

Almons Slices on plate


I like to eat mine with a big glass of milk, but I'm sure a nice steaming cup of Joe would be great too.

Friday, April 17, 2009

Sometimes there is nothing better.....

.....then laying in the sunshine with your dog.

Evan Moose in the sun


Well maybe Moose would argue that the scratching behind the ears was pretty darn good too.

Thursday, April 16, 2009

Coconut Custard Pie with Sweetened Whipped Cream

Coconut Cream Pie CU

While I didn’t inherit my sweet tooth from my Dad, I did inherit my love of coconut from him. I’m pretty much a sucker for anything with coconut in it. My favorite confection at the bakery is the coconut snowball. Deep dark chocolate cake, covered in light and fluffy, not too sweet frosting, which is rolled in coconut. That’s pretty much the perfect dessert for me. And don’t even compare my beloved snowball to those horrible pink marshmallow Hostess balls of goo that you can buy at the convenience stores. Yuck. Give me the real thing. Note to self: I must try and find a recipe for that bakery-like snowball.

Ok back to coconut. I made this coconut custard pie for Easter last weekend, knowing that my Dad wouldn't touch most of the sweets I made. I threw this pie together for him so he wouldn’t be the only one without something sweet to end his Easter Sunday. This recipe was a snap to put together, and that sweet whipped cream....I could eat it by the bucketfuls.

Coconut Custard Pie
Printable recipe
½ cup all purpose flour
¾ cup granulated sugar
¼ teaspoon salt
2 large eggs
1 ½ cups of half & half
1 ½ cups coconut milk
1 ¼ cups sweetened flaked coconut
1 teaspoon vanilla
1 pie crust, baked and cooled

In a large saucepan whisk together the flour, sugar and salt. Whisk in the eggs, half & half and coconut milk. Whisk until smooth. Heat the mixture over medium heat, whisking frequently until the custard thickens and comes to a boil. Let it cook for about another minute then stir in the vanilla extract and the coconut. Pour into the pie shell and refrigerate until chilled – at least 4 hours, preferably overnight.

Sweetened Whipped Cream
1 ¼ cups chilled heavy whipping cream
4 tablespoons confectioners’ sugar
1 teaspoon cornstarch
½ teaspoon vanilla

In a medium bowl, beat all the ingredients until stiff peaks form (approximately 6 minutes). Spread over custard filling and top with toasted coconut. Keep chilled until ready to serve.

Monday, April 13, 2009

Spaghetti Pie

Spag Pie CU

Saturday I decided I should make something for the guys to munch on while I was on a marathon cooking and baking frenzy in the kitchen. Something fairly quick and easily re-heatable.

I first saw this recipe on Picky Palate. Spaghetti, cheese, meat and sauce nestled between two pieces of bread....sounds pretty good to me.

I made a few changes. I added a cup of cheese to the mixture, chopped garlic, and a half pound more of meat. The results.....delectable!

The kids went crazy for this. It was nice to be able to slice a piece (just like a pie) when you wanted to and re-heat and eat. Definitely a keeper!

Spaghetti Pie
Recipe adapted from the Picky Palate
Printable recipe
3/4 lb spaghetti* (I used bucatini)
2 tablespoons olive oil
1 onion, finely chopped
1 1/2 lbs ground beef
½ teaspoon salt
¼ teaspoon pepper
3 cloves of garlic crushed
26 oz jar of pasta sauce
10 fresh basil leaves, stacked rolled and thinly sliced (chiffonade)
¼ cup fresh grated Parmesan cheese
2 cup shredded mozzarella
1 pkg Pillsbury French bread loaf

For topping:
olive oil
½ teaspoon garlic salt

Preheat the oven to 350. Cook the pasta until it is al dente, drain and set aside.

Heat 2 tablespoons of oil in a large skillet over medium heat. Sautee the onions for 5 minutes, add the garlic and cook 1 more minute. Add the ground beef, salt and pepper and cook 7 – 9 minutes, or until meat is cooked through. I drained out any fat that was in the pan at this point. Reduce heat to low and stir in the sauce, basil, and cooked pasta. Turn off the heat.

Spag Pie slice

Open the French bread and unroll it. Cut it into 2 equal parts. Take one piece and press it into the bottom of a well-greased spring form pan, pressing the dough up the sides slightly. Bake the dough for 10 minutes. Remove from oven and set aside. Mix in 1 cup of the mozzarella cheese into the spaghetti mixture and transfer into the spring-form pan.

Sprinkle the top the remaining 1 cup of mozzarella and1/4 cup of the Parmesan. Take the remaining piece of dough and place it over the top of the spaghetti. Try to cover the entire surface. I cut mine into 2 pieces to make it fit. Brush some of olive oil over the top and sprinkle it with garlic salt.

Bake for 20 to 25 minutes or until the bread is golden brown. Let cool 10 – 15.


Here’s a tip for getting this dish out of the pan, take a sturdy bowl that’s smaller than the spring form pan and place it upside-down on the counter. Place the spring form pan over the bowl and push down. This helps release the bottom of the spring form pan. It also helps if someone else is there to help ya.

Spag Pie ECU

*The original recipe called for making 1 pound of spaghetti and using the leftover later, but I found it easier just to make ¾ of the package and it worked out perfectly.

Thursday, April 9, 2009

You’ll be dying to try these….

Get it dying…..ok that was bad.

Last night was egg coloring night. We usually dye our eggs closer to the weekend, but Saturday’s opening day for fishing season and my two will be up and out bright and early that morning on the pond fishing, so we colored them last night.

Evan still enjoys dippin’ eggs with me. Jesse has moved on. We asked him if he would like to participate but sadly our inquires were met with a rolling of the eyes and a muttering of “No thanks”. I think these kinds of family activities are now beneath him. Although he was busy on the phone making plans for the movies, he did come back a few times to crush an egg or two. Oh teenagers and all their angst.

Egg collage Evan


I always lean towards the earthy, natural side of things, so my eggs are no exception. I’ve been dying eggs this way for a few years now.

eggs with leaves

How did I make the lovely leaf impressions on my eggs you ask?
Let me tell you how easy it was.

All you need is some leaves (I used flat leafed parsley) and some old pantyhose or knee-highs. You don’t have to limit yourself to parsley leaves; any kind of leaf that will lay flat will work. There might have been a few out in the yard, but it was cold, damp and dark outside, so the parsley worked just fine for me. Here’s how simple it is to make these:

Cut the pantyhose or the knee-highs into 6-inch lengths (give or take, precise measurements really don’t matter).

Choose a nice flat leaf with a fairly interesting pattern.

Lay the leaf on the eggs and wrap the hose around the egg tightly.

eggs with leaves 2

Knot the panty hose on the opposite side of the egg from where you put the leaf. You can also kind of twist the hose into a knot. As long as it stays in place it will work.

Now place your egg into the dye until you get the desired color.

Take a pair of scissors and snip the egg where you knotted it and quickly peel the leaf away. At this point I gently blow on the spot where leaf was so the dye doesn’t pool back onto the white of the leaf pattern. Let air-dry.

I love my leafy eggs. I also love the eggs that my co-worker gave me from his neighbors chickens. Check these out:

egga natural 1

I know the gorgeous natural colors of these eggs can't be captured on a computer screen, but trust me are really beautiful. Nope, there not colored, these babies are SOOTC (Straight Out of the Chicken), lol. The photos don’t do them justice. The shades are so beautiful that I really don’t want to crack them and eat them! Makes me want my own chickens so I could always have blue and green eggs.

Lastly this is what happens when we let my husband play.
Yes those are eggs shells on his eyes.
Yes he looks like a deranged cookie monster.
Yes I married a dork (but he does make me laugh).

Cookie Monster eyes

Chocolate Birthday Cake

Nanas Cake

A few weeks before my grandmother’s birthday, I went searching for a great chocolate cake recipe. Since she is the person I inherited my sweet tooth from. I thought it only fitting that I find the most fantastic chocolate cake I could for her. This recipe was originally called Double Chocolate Layer Cake because of the addition of chocolate frosting. I used butter cream frosting and put a layer of fluffy white cream in the middle that I took from my devil dog cake recipe that my Pa loved so much. It was the perfect balance of chocolate, creamy, buttery goodness.

Nana with sign

When Gram arrived at my house for her party, my Mom quizzed her to see if she remembered who I was. At Christmas time she knew me and remembered my name. Fast-forward to last week and now my name escapes her. My Mom said to her:

Mom: (pointing to me): Who’s that Mom?

Gram: (smiling): I can’t recall.

Mom: She’s your granddaughter Mom.

Gram: Is she?

Mom: Yes Mom, her name starts with an L.

Gram: (after thinking for a minute): Lena??

Lena?? Well….um….kinda close I guess. She had a friend named Lena a long time ago, maybe that’s where the name came from?? Who knows?? A minimum of eight times she asked “Who made this cake?” Lisa did, everyone would say. Three minutes later the same question. After the 7th or 8th time, my sister-in-law finally yelled “Lena made it Gram” and she looked right at me and told me it was delicious.

Choc Cake middle

Nana candle blowimg

It was a good day for her. She constantly giggles like Betty Rubble. That makes me feel good cause it tells me that wherever she is in her little world, it’s a happy place and if I know my Gram, it’s filled with all things sweet and delicious. We should all be so lucky.

This was the perfect birthday cake. It cooked up high to make a very impressive presentation. I’m glad I used a lighter frosting for the middle. It broke up the chocolate layers and was the perfect fluffy center.

choc cake piece

Chocolate Layer Cake
Gourmet, March 1999
Printable recipe
3 ounces fine quality semisweet chocolate
1 ½ cups hot brewed coffee
3 cups sugar
2 ½ cups all purpose flour
1 ½ cups unsweetened cocoa powder (not Dutch processed)
2 teaspoons baking soda
¾ teaspoon baking powder
1 ¼ teaspoon salt
3 large eggs
¾ cup vegetable oil
1 ½ cups well shaken buttermilk
¾ teaspoon vanilla

Preheat the oven to 300. Grease two 10x2 round cake pans. Line bottom with rounds of parchment or wax paper and grease paper as well.

Finely chop the chocolate into a bowl and pour the hot coffee over it. Let the mixture stand, stirring occasionally, until the chocolate is melted and the mixture is smooth.

Into a large bowl stir together the sugar, flour, cocoa powder, baking soda, baking powder and the salt. In another large bowl with an electric mixer beat the eggs until thickened slightly and lemon colored (about 3 minutes with a stand mixer or 5 minutes with a hand held mixer). Slowly add the oil, buttermilk, vanilla and melted chocolate mixture to the eggs, beating until well combined. Add the sugar mixture and beat on medium speed until just combined.

Divide the batter between the pans and bake in the middle of the oven until a tester inserted in the center comes out clean. 1 hour to 1 hour and 10 minutes. Start testing after an hour.

Cool layers completely in pans on racks. Run a thin knife around the edges of the pans and invert layers onto racks. Carefully remove the paper and cool completely. Cake layers may be make 1 day ahead and kept well wrapped in plastic at room temperature.

Nana cake fork

She looks like she wants to kick my ass in this picture.

Monday, April 6, 2009

Malted Milk Cupcakes

Malted Milk CC chair

Thanks again to my friend Lee who always sends great recipes my way. She sent this one from CHOW for a Triple Malt Chocolate Cake. Because I can never leave well enough alone, I opted to make cupcakes and use my favorite buttercream frosting recipe.

Since Easter is just around the corner, I thought I’d decorate them with some toasted coconut and a few Cadbury Mini Eggs. Little nest of coconut with my favorite chocolate eggs nestled in the center.

Have I mentioned that Cadbury Mini Eggs are my most favorite of all the chocolate confections? I haven’t? Well let me sing it from the rooftops – I HAVE A MAD OBESSION WITH THE MINI EGG! It’s true. I’ve only purchased one bag of them this season, granted it was a gigantic bag from Sam’s Club, but I have put it far from my reach so they aren’t easily accessible. I warned the youngins that no one was to touch them until the cupcakes were decorated. They sat safely out of reach until it was decorating time. I can no longer vouch for their safety now. It will be a mini egg free for all in this house from this point on. Thank goodness they only come out once a year.

Malted Milk CC flower


On to the cupcakes! Oh the delicious, moist and delectable cupcakes. I have to admit, while I was mixing this batter, there were times when I was tempted to take a straw and drink directly from the mixing bowl. The batter smelled so good, like a big malted milk shake, and when they were in the oven baking…..oh my goodness….my whole house smelled like a chocolate shop. I guess it’s the malted milk powder that gives them that intense chocolate smell. Not that I am complaining!

Where do you find malted milk powder pray tell??? Glad you asked. I went to 3 stores before I discovered that Ovaltine is actually malted milk powder! I know you can buy some fancy powders in specialty shops, or via mail order, but dammit, my cupcakes can’t wait! Ovaltine worked perfectly.

Malted Milk CC CU

I have to say…these were some of the BEST cupcakes I have ever sunk my sweet teeth into. (I like sugar way too much to just have a sweet tooth). Make this cupcake and top them with my favorite buttercream frosting recipe. Your sweet teeth will thank you.


Malted Milk Cupcakes
Printable recipe
2 cups malted milk powder (Ovaltine)
1 2/3 cups all purpose flour
2/4 cup unsweetened cocoa powder
1 teaspoon kosher salt
¾ teaspoon baking soda
3 large eggs
1 1/3 cups granulated sugar
2/3 vegetable oil
2 teaspoons vanilla extract
1 1/3 cups whole milk

Heat the oven to 325 and arrange the rack in the middle.

Combine the malted milk powder, flour, cocoa powder, salt and baking soda in a large bowl. Whisk to aerate and break up any lumps. Set aside.

Combine the eggs, sugar, oil and vanilla in a separate large bowl and whisk until combined and smooth. Add 1/3 of the flour mixture and whisk until just combined and smooth. Add ½ the milk and whisk until smooth. Continue with remaining flour mixture and milk, alternating between each and whisking until all ingredients are just incorporated and smooth.

Pour the batter into lined baking muffin tins, about 2/3 full. Bake 20 - 23 minutes, or until toothpick inserted in the middle comes out clean. Mine we done at 21 minutes. Let cool in pans about 5 minutes then remove to a wire rack to cool completely. Frost with buttercream then sink your teeth into one of the best cupcakes you've ever tasted.


Thanks again to Lee, one of my favorite chicks!!
Malked Milk CC chick

Saturday, April 4, 2009

Oven Roasted Fingerling Potatoes - Back to Basics

fingerlings baked

I love fingerlings potatoes. They are sweet, tender and cook fairly quickly, not to mention that they are so damn cute too...oh and the colors! How could you not want to eat a purple potato??

I always had a hard time finding these in my local markets. I was so happy to see these at Sam's Club last week. A 5 pound bag cost me $5.37. Bargain priced for these kind of spuds if you ask me.

Here’s just how simple it is.

Wash and scrub the amount of potatoes you want to use. Let them try on some paper towels. Once they are dry slice any of the bigger potatoes in half. You can leave the smaller ones whole. Put them in a large bowl and pour some olive oil over them, just enough to coat them all. Now sprinkle them with a generous amount of salt and pepper, then get your hands in there and toss them so they are all evenly coated.

fingerling

Preheat the oven to 450. Arrange them cut side down in a single layer on a sheet pan. Don’t use foil. It won’t allow the potatoes to get a good sear on them. Sprinkle them with another douse of salt if you think they need it. Pop them in the oven and check them at the 30-minute mark. You might have to run a spatula under them to loosen them up a bit at this point. Put them back in for another 10 to 15 minutes. You want them to be nice and crunchy and golden brown on the bottom.

What I love about these potatoes is they don’t need anything on them. No butter, or sour cream, nothing. They are creamy and buttery tasting all on their own. The kids like them cause they get to eat a '"colored" potatoes.....how very exotic.

fingerlings bowl

I made 2 sheet pans full for Nana’s birthday party and I only had a handful left. My oldest son woke up the next morning and the first thing he asked me was "are there any of those potatoes left?".

Yup, they are that good
.

Thursday, April 2, 2009

Mushroom Casserole

mushroom casserole

What a great little side dish I discovered. I had ripped this recipe out of some magazine put it to rest with all the other clippings in my recipe basket. I dug it up when I was searching for a side dish to go with the sirloin tips we had last weekend. We love mushrooms at my house so I knew that even if it came out mediocre, it would get eaten. You’d have to abuse a mushroom pretty badly for us not to eat it.

Ok so it’s not the most photogenic food in the world, but we loved it. The mushrooms are creamy and the topping is nice and crunchy. It was the perfect accompaniment to go along with steak and the prep work took 5 minutes. I had bought a package of pre-sliced mushrooms so it was a breeze to throw all the ingredients into a pie pan and pop it in the oven.

mushroom casserole 1

I was worried that baking the mushroom would make the dish soggy, but it didn’t at all. The mushrooms still had enough “bite” to them. We really liked it. They went well with the steak but I can see myself making these again to serve with chicken.

Mushroom Casserole
Printable recipe
Two – 8 ounce packages sliced mushrooms (or one 16 ounce package)
¼ cup beef broth
1 tablespoon flour
½ cup heavy cream
½ teaspoon cayenne pepper
½ cup breadcrumbs (I used Panko)
½ cup grated Parmesan cheese
2 tablespoons butter, cut into small pieces

Preheat the oven to 350. Place the mushrooms in a 2-quart pie pan. I used a deep-dish pie pan and it worked out well, but you could use a regular ole glass Pyrex pie plate and it would have worked out fine too. Remember the mushrooms will shrink a lot in the oven.

In a small saucepan combine the beef broth and the flour. Cook over medium heat, stirring occasionally until sauce is thickened (about 1 to 2 minutes). Stir in the heavy cream and cayenne. Salt to taste. Immediately pour over the mushrooms.

In a medium bowl mix together the breadcrumbs and Parmesan. Sprinkle on top of the mushrooms. Top with the pieces of butter. Bake until golden brown, about 45 minutes.