Wednesday, September 26, 2012

Crock Pot Roast Beef

Roast Sliders 2


Hi everyone!

It's been a busy few weeks at the homestead. We have tackled a few projects over the past week.

We pulled the rug up in our bedroom to reveal beautiful oak hardwoods. I am beyond thrilled. It was a full day of pulling up nails and moving furniture and cleaning the floor (which was in almost perfect condition!) but the everything is back in place now and the room looks beautiful.

Our breezeway (the room that connects our garage to our house for those of you who don't know what a breezeway is) has been in a constant stage of being upgraded for the past year. A tile floor went in, all the walls were painted and now we are moving on to the last stage.....all new windows and a new storm door. That should be happening sometimes next week.

The week after that we are on vacation! I'll have a girls-day out to Ikea, we'll be taking some friends to Salem MA., and hopefully enjoying the gorgeous foliage here in Rhode Island.

We'll also be squeezing in apple picking this weekend, so get ready for some new apple recipes. I love apples. I love Fall. I love fall in New England. Can you tell?

Since Fall officially arrived last Saturday, I think it's time to break out your crock pots and Dutch ovens and cook up some delicious fall foods don't you?

I know I'm ready.

I found this recipe on Deep South Dish. Yes it uses 3 little envelopes. That doesn't bother me. What I love about this recipe is you can prep everything the night before, and when I say prep I mean take 2 minutes to get everything ready, and then just let it cook the next day.

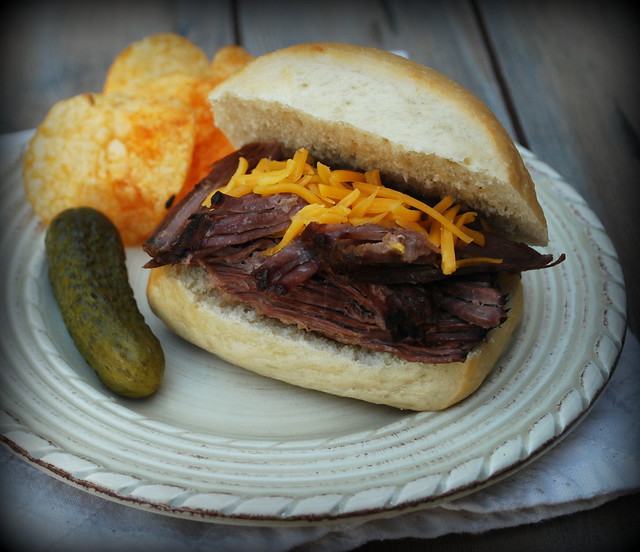
We got two meals from this. The first night we had roast beef sandwiches on little slider buns with cheddar cheese and the second night we used the shredded beef to make tacos.

Two for the price of one, you can't beat that.

This roast had just the right amount of seasoning and boy did my guys love it smothered in gravy. Everything tastes better smothered in gravy right?

Roast Sliders


Crock Pot Roast Beef
adapted from a recipe at Deep South Dish
3 to 4 pound beef chuck roast (or other braising roast) I used a 4.5 pound chuck roast
1/2 cup of water
One envelope of dry onion soup mix
One envelope of dry Italian dressing mix
One envelope of dry brown gravy mix
1 (8 ounce) jar of salsa or picante sauce


Whisk together the water with ingredients from all 3 of the envelopes. Pour a little of the liquid on the bottom of the crock pot, place the roast on top. Don't be tempted to season the roast. There is plenty of salt and other seasonings in these envelopes.

Pour the remaining liquid mixture all over the top and all around the roast. Pour the jar of salsa or  picante sauce on top of the roast, cover and cook on low for 8 hours, or on high 4 to 5 hours.

To thicken gravy, remove the roast and tent with foil to keep warm. Carefully transfer the contents of the crock pot to a saucepan and stir in a slurry of one tablespoon of cornstarch with just enough water to loosen. Stir into the sauce, bring up to a boil, reduce and simmer until thickened.

Note: Can use any appropriate braising beef roast including eye or bottom round steak (not top round), rump, shoulder, arm or blade pot roast.

Thursday, September 20, 2012

Acorn Squash & Pear Purée with Glazed Almonds

Acorn Squash and Pear

I'm so happy that the chillier weather is back aren't you?

I almost giddy inside with anticipation for these fall months. I can't wait to pull out all my sweaters and comfy socks. See ya later shorts and t-shirts, I've got some cozing up to do!

One of my most favorite things about fall is digging into my comfort food folder. It's filled with soups, stews and casseroles, all the things I've been missing these past summer months.

My friend Mitch and I can't even say "soups, stews and casseroles" without laughing. Those three words have kind of turned into a little mantra for us. He'll say "what's so great about fall Miss Lisa?" and I'll yell "soups, stews and casseroles!" So it's become sort of a joke with us....a very delicious joke.

I've got a bunch of recipes that have fall written all over them. I can hardly wait to share them all with you.

Let's start off slow with a side dish....this Acorn Squash & Pear Puree is just perfect. I'm a squash lover, so any dish that includes it makes me happy. Add in a little pear for sweetness, even better.

Acorn Squash & Pear Purée with Glazed Almonds
recipe from Country Living Magazine
3 medium (about 4 1/4 pounds) acorn squash, halved and seeded
2 ounces (about 1/2 cup) sliced almonds
6 tablespoons unsalted butter
1 tablespoon sugar
3/4 teaspoon chopped fresh sage
Salt
3 Anjou pears, peeled, cored, and diced into 1/2-inch cubes
3/4 teaspoon ground ginger
1/4 teaspoon allspice
3 tablespoon heavy cream

Preheat oven to 350 degrees F. Place squash, cut side down, in a baking dish. Add 3/4 cup water. Roast squash until fork-tender, about 1 hour. When cool enough to touch, scoop flesh with a large spoon into a medium bowl and set aside; discard shells.

In a small skillet over medium-high heat, cook almonds, 1 tablespoon butter, and sugar, stirring often, until almonds are toasted and glazed, 5 to 6 minutes. Stir in sage. Transfer almonds to a plate and season with salt. Set aside to cool.

Meanwhile, in a medium saucepan over medium heat, combine 1/3 cup water, pears, 1 1/8 teaspoons salt, ginger, and allspice and simmer until pears are tender, about 15 minutes. Add reserved squash. Stir with a wooden spoon, mashing any large pieces. Stir in heavy cream and remaining butter. Transfer mixture to food processor (or use an immersion blender directly in saucepan) and lightly purée. Season with more salt, if desired. Transfer to a serving dish and sprinkle with reserved almonds.

*I halved this recipe cause I'm on the only one in my house who lives squash of any kind.


Acorn Squash and Pear2

Friday, September 14, 2012

Chocolate Hazelnut No-Bake Cookies

Nutella Hazelnut cookies

I have a confession to make.

I love watching David Venable on QVC. He’s the host that does all the cooking shows.

He’s my little addiction Wednesdays and Sundays (that’s when In the Kitchen with David airs).

I don’t watch anything else on QVC, just David.

I can't explain why he sucks me in, or why I have to tape the shows, but I just do. I'm not even particularly interested in buying anything, I just like his show.

I'm not saying he hasn't lured me into purchasing anything from watching the show, cause a few things have caught my eye, oh yes they have. Only a few thing though. I had my eye on the salad chopper for a year before I bought it and I can tell you, I do use it, especially when I need to chop lots of veggies. Really comes in handy when I'm prepping veggies for soups. It's a great unitasker for me.

I also have a few sets of the lock & lock containers. Love them too. I keep all my flours and sugars in them.

Now you may be wondering how I find time to watch 6-8 hours of QVC a week? Well, I don't, but luckily I have a DVR so I tape the shows. I can watch a 3 hour show in about 20 minutes. I fast forward to the part where David bites into something delicious and makes a kooky face and then announces and actually does a happy dance when he eats it. (that's my favorite part).

I don’t know what it is about him, but I love to watch him.


Nutella Hazelnut cookies 1

He also has a cookbook coming out in a month or so. Of course I pre-ordered, that’s how you get the special edition with behind the scenes info that will not be sold in stores! I’m such a dork.

David made these Chocolate Hazelnut No-Bake Cookies a few weeks back and I was sold.

Nutella in my cookie? Yes please, a thousand times yes.

These cookies are a little chewy, a little crunchy and a whole lotta chocolaty.

Perfect to be packed in those school lunchboxes.


Nutella Hazelnut cookies 2


Chocolate Hazelnut No-Bake Cookies
recipe from David Venable
1/2 cup toasted chopped hazelnuts
2-1/3 cups quick oatmeal
1 (14-oz) can sweetened condensed milk
1-1/4 cup semisweet chocolate chips
1/3 cup chocolate hazelnut spread
1 tsp vanilla extract

Line baking sheets with waxed or parchment paper. Place the oats and chopped toasted hazelnuts in a mixing bowl. Set aside.

Combine the condensed milk and chocolate chips in a saucepan and cook over low heat, stirring constantly, until the chocolate is completely melted. Remove the pan from the heat, add the chocolate hazelnut spread and vanilla, and stir until completely incorporated. Add the oats and chopped hazelnuts to the chocolate mixture and mix until the oats are fully coated with chocolate.

Drop the mixture (2 Tbsp for each cookie) onto the lined baking sheets. I used a cookie scoop. Let the cookies set until cooled and hardened.

While these cookies are certainly sweet (travel-friendly) treats, they do offer some nutritional benefits thanks to all those oats and the hazelnuts. Before the kids go off fishing, kayaking, or hiking, have them eat a few cookies. They’ll be happy to!

Monday, September 10, 2012

Herbed Salts


Basil salt 1


Basil, basil everywhere!

One sure sign of the end of summer is the harvesting of my huge basil patch. It’s a good 4 foot by 3 foot patch and as of this writing it’s about 4 feet tall.

I usually make a few batches of pesto with it each year, but this year I have so much of it that I knew I needed to find something else to make with it. I took some of it and made olive oil ice cubes with it.

Yes, olive oil ice cubes. You read that right.

I think I saw the idea on Pinterest. I’m sure there is some kind of recipe, but I just winged it.

Here’s what I did…

Basil & Olive Oil Ice Cubes
I chopped up a big bunch of basil leaves in the food processor. Just pulsed it until it was chopped up well. I bought cheap ice cube trays at the dollar store (2 for a buck) and put a heaping teaspoon of chopped basil in each ice cube holder, then I filled them with olive oil. Into the freezer they went and once they were frozen solid, I bagged and labeled them for the freezer. Now they are ready for a quick drop in a frying pan, or for a drop in a big pot of soup. So simple!

Next came seasoned salts.

Enter my mother-in-law. Can I just say how thankful I am that I have her in my life? Can I? She is always on the lookout for great recipes for me. She’ll call and tell me about something she saw in a magazine or on TV and then it will appear in my inbox. She sent me this basil salt recipe from Food Network magazine and got to work making it over the labor day weekend.

I had a steady flow of teenage boys in and out of my house over that weekend, so I decided to put some of them to good use. I had my youngest Evan and his friend Tyler come and pick a huge bucketful of basil with me.

We sat at the kitchen table plucking basil leafs off plants for a good half hour. The boys them complained that their hands stunk. Stunk? How can you think the smell of basil stinks?

The basil salt was super easy to make. I can hardly wait to use it on lasagna and stuffed shells. The smell is amazing too!


Basil salt

Basil Salt
1 cup packed fresh basil leaves
1 cup kosher salt

Place the basil leaves and the salt in a food processor ( you could use a blender if you don't have a food processor). Pulse until the basil is chopped. You don't want to process it too much, just a few pulses will do.

Line a baking sheet with parchment (this makes for easy transportation later) and spread it out on the pan.

Heat the oven to 225 and bake for 15 minutes. Take it out of the oven and scrape it up a little with a spatula. It will tend to clump up a bit in the oven. Just break it up, move it around and put it back in the oven for another 15 miutes. Let it cool for a bit, then pick up the parchment and pour the salt back into the food processor. Pulse again until finely grated. Store in an airtight container.

Note: you can make this recipe in any quantity you choose. I think the original was a half cup. I actually used 4 cups and made a huge batch, but you can use whatever about you like. Just use equal parts packed basil leaves and kosher salt. 

So after this recipe, my brain start churning and I start to think about the other herbs growing in my garden and what kind of flavored salts I could make with them.

In addition to a huge basil patch, I grow a lot of thyme too. This led me to my next inspiration....Lemon Thyme Salt.

Zesty with a touch of tang this salt would go perfectly with fish and chicken.

Lemon thyme salt 1 r

Lemon Thyme Salt
Zest of 1 lemon
2 tablespoons of fresh thyme leaves
1/2 cup kosher salt

In the bowl of a food processor add the salt, the zest of one lemon and the thyme leaves. Pulse until combined. Line a baking sheet with parchment (this makes for easy transportation later) and spread it out on the pan.

Heat the oven to 225 and bake for 15 minutes. Take it out of the oven and scrape it up a little with a spatula. It will tend to clump up a bit in the oven. Just break it up, move it around and put it back in the oven for another 15 miutes. Let it cool for a bit, then pick up the parchment and pour the salt back into the food processor. Pulse again until finely grated. Store in an airtight container.