Tuesday, June 30, 2009

Mezgaldi

Mezgaldi Onions CU

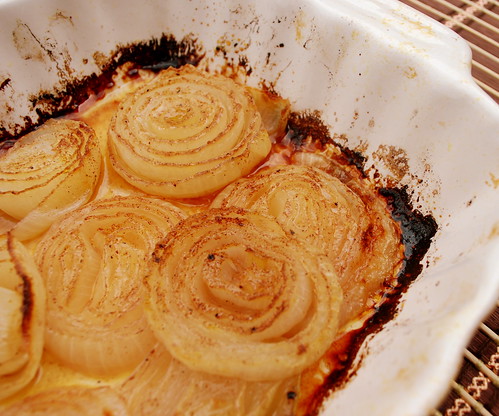
When I saw the title of this post over at Dutch Girl Cooking, my first thought was Mezga what?? Then I saw the photos of the beautiful caramelized onions, browned to perfections, calling to me from their warm baking dish.

I love onions.

Wait I don’t think you understand.

I LOVE ONIONS.

You all have to do me a favor. When I tell you that I love onions, visualize me saying it in the sultriest, most demonstrative voice you can imagine. I really, really love onions. Caramelized onions are my crack. They are so high on my list of foods I love, that the only thing I can liken my craving to is the way I imagine a heroin addict must crave his next hit. It’s that bad.

I’ve been known to cook up a heaping bunch of them and eat half of them straight out of the pan before they even hit the table.

I got it bad.


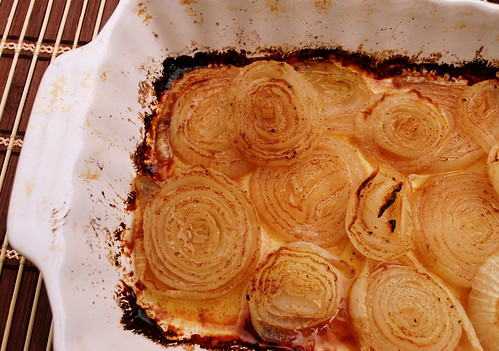
So imagine now the salivation that occurred when I saw this recipe for a Moroccan based dish for my beloved onions brushed with cinnamon and ginger and curry powder, oh my. This dish was originally made by Kay’s Moroccan neighbor. Bless you sweet woman. I could have sat down with some crusty bread and eaten all of these straight outta the baking dish. The flavors were just amazing. You get the little hints of the spices in each bite. This dish was so excellent that I can’t wait to make again.

Mezgaldi Onions 1

Mezgaldi
recipe from Dutch Girl Cooking
Printable recipe
4 medium sized onions (I used yellow, Kay thinks a sweet onion would make this dish too sweet).
¼ teaspoon ground cinnamon
¼ teaspoon ground ginger
1/8 teaspoon turmeric or ¼ teaspoon curry powder
¼ teaspoon coarse black pepper
3 tablespoons oil
2 tablespoons water
1 tablespoon granulated sugar

Peel 4 medium sized onions and slice into 1 inch thick. Grab a bowl and combine 3 tablespoons oil with the turmeric or curry, the cinnamon, ginger, and pepper. Mix it all up.

Brush the oil on top of both sides of the onion. Place them in an oven safe dish. It’s ok if they overlap each other.

If there is any marinade left, add it in as well and then pour 2 tablespoons of water down the sides of the baking dish. Tightly wrap with foil and place in the center of a preheated oven. Bake at 400 for 40 to 45 minutes, until they are nice and soft.

Take out of the oven, uncover and drizzle with some of the cooking juices that have accumulated at the bottom. Sprinkle the sugar on top. Turn the oven up (I put mine at 500) and place the baking dish back in, uncovered. Bake for 10 to 15 minutes, or until the top layer caramelizes and turns golden brown. I actually put mine under the broiler for about 5 minutes so they would get good and caramelized.

Heaven.

Mezgaldi Onions

Sunday, June 28, 2009

Quick Spaghetti Carbonara

Spaghetti Carbonara 1
Pasta
Bacon
Cream
Cheese
Eggs

What’s not to like about those 5 ingredients besides the fact that if you indulge in any one too much, your hips would double in size? Other than that small minor detail, just the mere thought of all those ingredients in one dish makes my heart swoon.

I set out to make some spaghetti carbonara. I had seen a lot of carbonara recipes floating around recently and every magazine I subscribe too seems to have at least one recipe for it lately. I looked around at a dozen or so recipes from sources I trust and found that no one makes carbonara the same way. There are a thousand different variations of it out there. Some with pancetta instead of bacon, some made with no cream, some with half & half, some include garlic, some don’t. When it comes to recipes like this one, I think you just kind of find the right combination of ingredients and flavors and just make it your own.

You think a nice Italian girl like me would have been making carbonara for years and years right? Nope. Can’t say that I have. Can’t even remember if my Nonna did either.

This is my version. It’s quick and easy. This is the way my family likes it. Well, let me make one correction, if my husband had his way, there would be 3 pounds of bacon in it.

Spaghetti Carbonara

Spaghetti Carbonara

Printable Recipe
1 pound of spaghetti or bucatini
10 slices of bacon
1 cup heavy cream
½ cup Parmesan cheese
5 large egg yolks
Salt & pepper
Additional grated cheese for serving

Cook the bacon in a large skillet over medium heat. Cook until the bacon is brown and crisp. Remove the bacon from the pan and drain on paper towels. Leave the drippings in the pan. Once the bacon is cool enough to handle, break it into pieces.

Whisk the cream, the cheese and the egg yolks in a medium bowl to blend. Whisk in 3 tablespoons of the drippings from the skillet. Set the cream mixture aside and discard the remaining drippings.

Cook the pasta in a large pot of boiling water until al dente. Please don’t over cook your pasta. Mushy pasta is just nasty. Drain the pasta and return it to the pot. Add the cream mixture to the pasta. Toss over medium-low heat until the sauce cooks through and coats the pasta (about 4 – 5 minutes). Mix in the bacon. Salt and pepper to taste. Serve with additional grated cheese.

Friday, June 26, 2009

Penne Salmon Bake

Penne Salmon Bake

We are a salmon loving family. It’s one of my absolute favorite fishes. My standard preparation for salmon is to cover it in honey and bake until it’s flaky, and trust me, salmon cooked that way is a great meal in and of itself, but I decided I wanted to experiment and incorporate it into a casserole. So I poked around on the food blog search and looked at what other people were doing with salmon and then came up with my own version of this Penne Salmon Bake.

This was creamy, but not too heavy. Everyone loved it, even my picky eater Evan. I served this with a nice big salad. Definitely one to make again.

Penne Salmon Bake
Printable recipe
8 tablespoons butter (1 stick)
1 pound penne
1 to 1 ½ pounds salmon fillet
1 ½ tablespoons honey (or enough to cover your salmon)
2 cups half and half
½ cup grated Parmesan cheese
¼ teaspoons ground nutmeg
1 tablespoon fresh parsley, chopped
salt and pepper

Preheat the oven to 400. Place a piece of parchment on a baking sheet and lay the salmon on it. Pour the honey over the salmon and spread to coat the entire surface. Bake for approximately 20 minutes, or until salmon flakes easily. Don’t overcook! Set aside until cool enough to handle. Flake into pieces with a fork. Turn the oven up to 425.

Grease a 2-quart baking dish. Cook the penne in boiling salted water until it is al dente, drain and return to the pot. Toss with one tablespoon of butter and set aside.

In a saucepan whisk together the half and half, remaining butter, cheese and nutmeg over medium heat until the sauce thickens. Add salt and pepper to taste.

Pour the sauce over the penne, add parsley and salmon and mix gently. I sprinkled a small amount of Parmesan over the top before baking too.

Bake for 15 to 20 minutes or until piping hot.

Penne Salmon Bake in bowl

Wednesday, June 24, 2009

Summer goals.

first tomatoes


· Learn to make a great cocktail.

· Perfect my new project - leaf castings.

· Learn how to make hypertufas.
(look it up)

· Go blueberry picking.

· Go strawberry picking.

· Eat lots of the berries that I picked.

· Cook with the berries I picked.

· Take my kids to Bodies Revealed.

· Go to the beach more.

· Have at least 5 picnics.

· Visit the Butterfly exhibit at the zoo.

· Catch up on my reading.

first growth spurt for the Fig

· Take better photos.

· Paint my toes a funky colors instead of my usual red.

· Create some new salads with all the greens I planted.

· Makes some new dressing to go with the new salads.

· Work on my making Christmas presents – yes I know I’m sick.

· Find a big Buddha statue for the garden.
No I’m not Buddhist, I just want a little fat man in the back yard.

first lettuce crop

· Worry less.

· Want Less.

· Give More.

I think I can do it.

Sunday, June 21, 2009

Ice Cream Sundae Bar

I highly recommend that at your next party you have an ice cream sundae bar.

Ice Cream Sundae bar

Ice Cream Sundae bar kids

The kids and the adults all loved it.

Sara declared me a genius for thinking of the idea.

Ice Cream Sundae Bar deck

Ice Cream Sundae Bar cups

The sugar hyped children told me they would love one at every party we host.

Smart kids.

Ice Cream Sundae Bar 4 kids

Saturday, June 20, 2009

Tortellini Pasta Salad

Tortellini Pasta Salad CU

This is going to be a quick post. It's going to be a very busy Saturday for us. We're having a birthday party for Jess today. Its rained most of the weekend. Oh I grumbled and cussed. Over the past 14 years we've had 2 birthdays without rain. We thought by holding off later into the month we'd surely get sunshine, but the weather forecast was grim. Rain predicted straight through next Wednesday!

We didn't prep the yard cause we figured that the party would be in the house, but we woke up this morning to find that the sun really did want to come out after all and the rain will be holding off till early in the morning hours! Thank you Mr. Sunshine, thank you!

Now we are on a mad dash to get the rain soaked yard ready and I have to finish up a few things in the kitchen. I thought I'd post this super easy recipe for Tortellini Pasta Salad that is super simple to throw together.

Tortellini Pasta Salad

There really isn't a recipe for this. I just add in whatever I have on hand.

Tortellini Pasta Salad

Frozen cheese tortellini (I used 2 pounds cause I'm feeding a crowd)
Pesto
red onion
sliced olives
artichoke hearts
diced cheddar cheese
fresh parsley
cherry or grape tomatoes

Cook the tortellini in boiling salted water until done. Drain and rinse with cold water. Add the ingredients into a large bowl and toss with pesto. I also add a dash of Italian dressing in just before I serve it to give it a little zing.

I used store bought pesto (GASP!). My local warehouse club sells a great organic pesto from a company called LOVE Inc., which is fantastic. I use this until I can make more of my own. Come on sunshine, my basil plants need some photosynthesis!

So if your looking for a change from the usual pasta salad give tortellini a try.

Tortellini Pasta Salad TS

Thursday, June 18, 2009

Schools out for summer!

Today is the last day of school for the kids.

They are pretty excited about it.

Jesse plans on sleeping till noon tomorrow.

I'm sure he will have no problem doing that.

He also decided that he was going to buzz off all his hair Wednesday night. Seeing that he spends more time in the bathroom then the rest of us combined, I was more than happy to assist him in removing the wavy clumps of tresses that have been blow dried for hundreds of hours over the past school year.

Jesse before:

Jesse before

Jesse during:

Jesse during

Jesse After:

Jesse after

The aftermath:

Jesse during 1

John said he went from looking like Moe to looking like Curly.

Jess said he feels much better already.
I'm crossing my fingers that this will cut down on shower and bathroom time.
I can only hope.

Wednesday, June 17, 2009

Pepperoni Pizza Dip

Pepperoni Pizza Dip pan CU

My mother law is always passing along great recipes to me. It’s kinda nice to be able to make something from a recipe that she sent to me. After it’s made we get on the phone and discuss it and talk about what we changed and how so and so raved about it or how it was gobbled up and what people were saying. If only she lived closer so we could make it and eat it together. *sigh* Oh well, making the recipe and calling is the next best thing.

This particular recipe comes, not from my mother-in-law, but from Aunt Margie, my father-in-laws sister. (Mom did pass it along to me though). Although I have yet to meet her, Aunt Margie holds a fond place in my heart. I know, just talking to her on the phone that once we meet, we will get along just wonderfully. So much thanks to Aunt Margie for this uber-delcious (yeah I made new word up) pizza dip, which is totally addicting.

Think of all your favorite pizza toppings melted together with cheese, now put it on a cracker, or a chip or even some toasted tortilla chips and you have a dip that is unbelievably good. The best part, everything gets thrown into a bowl, mixed and then baked. How easy! The kids absolutely loved this.

Pepperoni Pizza Dip hand1

As always I changed it up a bit.

The original recipe didn’t call for the mushrooms to be cooked. I always pre-cook my mushrooms to get most of the water out of them before putting them in a baked dish.

It also didn’t specify that you cook the pepperoni to get a bit of the grease out either, but that’s something I always do to.

Lastly, it called for 1 can of black olives and 1 jar of green. No one in my house likes the green olives so I just omitted them, but if you love green olives; by all means go for it. We left out the green pepper too, no fans of that in the house either.

We brought this to a Memorial Day cookout and it was a big hit!


Pepperoni Pizza Dip pan

Pepperoni Pizza Dip

Printable recipe
8oz shredded mozzarella
8oz shredded cheddar
1 cup mayonnaise
1 ½ cups chopped pepperoni* (see note)
1 10oz package mushrooms, chopped (I used baby bellas)
½ cup chopped green onions
½ cup chopped green pepper (optional)
1 can (6oz) chopped black olives, chopped
1 jar green olives with pimento, chopped.

Cook the mushrooms in a sauté pan just until tender.

Combine the mushrooms and all the other ingredients in a large bowl. Spray a 9x13-baking dish (or a deep dish pie plate) with cooking spray. Place mixture into baking dish and spread to even out. Bake at 350 for 25 – 30 minutes.

Serve with crackers, tortilla chips, or garlic toasts like we did!

*I laid my pepperoni out on a paper towel for 30 seconds in the microwave just to get out some of the grease, and then I chop it up. You will have to do a few batches.

Monday, June 15, 2009

Outside my kitchen window

Outside my kitchen window is a birch tree that is home to a robin and her babies.
Here they are about 2 weeks ago.
See the 3 little beaks?

Robin3


Robin


Mama was sitting on them, keepin them all warm and snuggly inside the nest.


Robin1


I guess they were hungry. Look at those mouths begging for food.


Robin2


Fast forward a few weeks and look at how big those babies got.

Robin solo

They are still mighty hungry though.

RObins - 3 beaks

Their feathers are coming in too. This one wanted to show me.

Robins - wing

They are swaking and peeping all day long. Calling for their mama to come and fill their bellies.

I guess she heard them.

Dinner is served.

Robins - Mama with worm

So mama got on to the business of feeding her babies.

Robins feeding

Then she looked at me like she was quite annoyed, as if to say, "Theres that lady with the camera again".

Robins - evil eye

She got over it pretty quick, and the babies started to ignored me.
Mama still had one eye on me.

Robins - looking

A few days later I was out with my camera in hand again, when I noticed something...hey wait a minute...there's not three babies in that nest but.......

FOUR. Yup, count 'em four.

Robins 4

They were still pretty hungry.

Robins 4 hungry

So mama served up some dinner yet again.

Robins 4 eating

Meanwhile this little guy started to chime in. I think he was jealous that I wasn't taking his picture.

little bird on perch

He kept flying over my head, screeching at me, scolding me.

He did have one moment when he shut his beak.

little bird on branch

That was over quickly and he was hollering at me again.

little bird CU

It's been very noisy in my yard lately.

little bird on birdhouse

I bet I'll miss it when they leave though.

Saturday, June 13, 2009

Self Frosting Angel Food Cake

Self Frosting Angel Food Cake

Are you for real?? That’s what was going through my head when I read the post for self-frosting angel food cake on Lynn's site.

I love me some angel food cake, but add in a crunchy topping that does all the work by itself and whoa doggy, you have a dessert to die for.

The kids saw me making these and thought I was making marshmallows again.

Not overly sweet, topped with crispy, crunchy coconut topping, these would be perfect to pack for a picinc lunch or cookout.

Self-Frosting Angel Food Cake
Recipe from Cookie Baker Lynn
Printable recipe
6 eggs whites at room temperature
½ teaspoon cream of tarter
1/8 teaspoon salt
¼ cup plus 2 tablespoons sugar
½ cup sifted cake flour
½ teaspoons vanilla
1/8 tsp almond extract
½ cup flaked coconut

Self Frosting Angel Food Cake plate

Preheat the oven to 325. Position the rack in the center of the oven.

Beat the egg whites until foamy. Add the cream of tarter and salt. Beat until soft peaks form. Gradually add the sugar, 2 tablespoons at a time, until stiff peaks form.

Sprinkle the flour over the egg white mixture and carefully fold it in. Gently fold in the flavorings.

Pour batter into an ungreased 9-inch square-baking pan. Sprinkle coconut over the top. Bake for 30 minutes, or until wooden toothpick inserted in center comes out clean. Cool in pan about 40 minutes. Remove cake and cut into squares to serve.

Thursday, June 11, 2009

New look....again.

Yes I've done it again.

For those of you who have been following this blog since the beginning, you will notice that I have a new banner yet again.

I know some people remain loyal to one banner and have used it for the life of their blog, while others change theirs often. I wouldn't say I've changed mine often, but I every once in awhile I get the hankering to see something new. So I went searching on
Etsy, as I often do, and found someone to custom design a banner for me.

I fell in love with Renee's work at
Thompson Designs the minute I saw it. So many of her designs just screamed "ME". So after many emails back and forth, we came up with a banner that suits me perfectly. I love that she incorporated my love of cupcakes in it, and how cute is is that bird (which I hand picked myself thankyouverymuch) with the stolen cherry in his mouth??

If you're hankering for a new banner...I highly recommend Renee's work!

Wednesday, June 10, 2009

Easy Refrigerator Pickles

Pickles in the jar

Want fresh, crunchy, totally delicious homemade pickles all summer long??

I do, I do!

Want a super fast and easy recipe that will yield at least 2 big jars of refrigerator pickles? Is that you raising your hand??

Well do I have a recipe for you! I found this recipe in the latest issue of Taste of Home and as soon as I saw those beautiful dill spears in that magazine I decided I was making me some homemade pickles.

I love dill pickles. Sweet pickles are another story. There is just something wrong about a sweet pickle to me. Pickles should be tart and tangy, not sweet and sugary. Sugar is for desserts, not pickles.

I can’t begin to tell you how fresh and crisp these are. The flavor is phenomenal. I’d rate it 10 on the lip puckering scale.

Here are the baby cukes all cut up and ready for their dip in the brine.

Pcikles - raw sliced

I wrapped them up the big bowl and set it in the extra fridge we have in the garage so I wouldn’t be tempted to snatch some before they were done.

Dill Pickles in bowl

I let them sit for 2 days instead of the recommended 24 hours, and then I jarred them up with some of the liquid. Now I’m not sure if I should have included the liquid. It didn’t mention anything in the directions but it just didn’t seem right to set them in a dry jar with no liquid in it. If there are any experienced pickle makers out there, please let me know if I’m correct or not.

I planted some pickling cukes this year, so hopefully there will be many more batches to come.

Pickles in pie plate

Easy Refrigerator Pickles
Printable recipe
15 small pickling cucumbers
40 fresh dill springs
2 large onions, thinly sliced
5 garlic cloves
1 quart white vinegar
1 quart water*
1 cup canning salt (I found mine right near the kosher salt)

Cut each cucumber lengthwise into four spears. In a large bowl (the biggest you have) combine the cucumbers, dill, onion and garlic and set aside.

In a Dutch oven, combine the water, vinegar and salt and bring to a boil, stirring every once in awhile to dissolve the salt. Once it has reached a boil pour it over the cucumber mixture.

Cover the bowl tightly and refrigerate for at least 24 hours. Store in the fridge for up to 3 months.

*Save the empty 1 quart vinegar bottle, and fill it with the quart of water you need for the recipe.

Monday, June 8, 2009

Da winna is.....

orange daisy group

Yeah I just threw in that picture of those gorgeous daisies in my yard just so you'd have something pretty to look at when you checked to see if you were the winner.

Random number generator says it's:

LUCY from Sweets, Savories, etc.

Congrats Lucy!
Please email me your address and I'll get that tile right out to you!

Thanks all.