Monday, January 28, 2008

Knoppers, Hanuta & Milka...Oh my!!!

Tati's Mom arrived from Slovenija last week. Her name is Francesca, same as my Nonna's. In Slovenija they call her Fanny. We all call her Mama. John, her son-in-law, affectionately calls her "Umpa Lumpa". Well maybe not affectionately, but that's what he calls her, and he's fairly accurate. I must say, the woman is short. At 5 feet I tower over her and all the kids can easily rest their elbows on her noggin. She's itty bitty and she's a sweetheart. Altough I speak no Slovenijan and she speaks very little English, we have managed to communicate over the past 20 years. She arrived, as always, with the delectable German chocolates that I adore. I love her for that *sniff*. Chocolate is chocolate no matter what language you speak, least in my little world I like to think so. Mama stays in the USA about 3 - 4 months out of the year. The woman knows the way to my heart. Here's what I got:

Hanuta - rich chocolate with roasted chopped hazelnuts sandwiched between 2 chocolate coated wafers.

Knoppers - Similar to the Hanuta, Knoppers are crispy wafers made with one third whole wheat flour (see that, whole wheat flour, it's practically a health food) with delicious milk and melted nougat cream filling. It also has the crunchy roasted hazelnuts. Be still my heart.

Milka - You can get Milka here, but not the Milka Alpenmilch, my favorite of the Milkas. It's made with Alpine milk chocolate and it's fantastically delicious and smooth. It has a milk cream filling. Tati calls it Kinder Schokolade (Kids Chocolate) because of all the milk in it, they gave it to the kids all the time in Germany and Slovenija.

I was trying to decide which one of these I love the most, and you know, it's just like they were my little chocolate children, I love them all equally......and yes, I share them......dammit.

Sunday, January 27, 2008

Blueberry Gâteau

I think I could make, and eat, just about everything on Elise's site (simplyrecipes.com). Browsing through page after page of lusciousness last night, I came across a recipe for this blueberry cake. Always looking for blueberry recipes to use up the pounds I have in the freezer, I thought I'd give this one a try. It's snowy, windy and chilly out...perfect day for cake!

Blueberry Gâteau

From Elise: Although the cake was delicious, I'm beginning to think that fresh blueberries are best eaten fresh. If we can't tell the difference after cooking between fresh or frozen blueberries, we may as well use frozen for baked goods. Trader Joe's sells good quality frozen blueberries (Lucky people who have a Trader Joe's near them!) and for less than what you will pay for fresh, even in season.

1 cup plus 1 teaspoon of all purpose flour
1 teaspoon baking powder
1/2 teaspoon kosher salt
4 oz (1 stick) unsalted butter, softened
1 cup sugar
1/4 teaspoon vanilla
2 large eggs
2 cups blueberries, rinsed and drained (may substitute frozen blueberries, or substitute some of the blueberries for raspberries)
1 teaspoon lemon juice
Confectioner's sugar

Preheat oven to 350°F. Lightly grease a 9-inch springform pan and dust with flour. Or use a 9-inch round cake pan that has been greased and dusted with flour and lined on the bottom with parchment paper. In a small bowl combine 1 cup of flour with the baking powder and salt and set aside.
Using a mixer, cream the butter, sugar and vanilla until light and fluffy, about 3 minutes. Add the eggs one at a time and beat until well blended. Reduce the speed of the mixer to low and gradually add the flour mixture. Beat until smooth. Pour the batter into the baking pan.

In a medium bowl, combine the berries with the remaining teaspoon of flour and the lemon juice. Spoon the berry mixture over the batter.

Bake for 1 hour at 350°F, or until a toothpick inserted into the center comes out clean. Remove from the oven and let the cake cool in the pan for 10 minutes. If using a springform pan, slide a thin knife around the edges of the cake to release it from the pan before you release and remove the springform. If using a cake pan, slide a thin knife around the edges of the cake and invert it onto a cake rack. Transfer the cake to a platter, berry side up. Dust the cake with confectioner's sugar before serving.

Meatballs!

I made this recipe about 5 times before I got the amounts right. Today was the final run through and I have to say....they are fabulous (even better than my Mom's). I know that was totally terrible to say, but it's true. Sorry Mom.

Lisa's Meatballs
2 1/2 pounds ground chuck (do not substitute)
1 cup bread crumbs
3 large eggs
1/2 cup whole milk
1 cup grated Romano cheese
1 small Spanish (red) onion, finely chopped
4 or 5 cloves garlic, finely chopped
1/3 cup fresh chopped parsley
1/3 cup fresh chopped basil (again, no fresh basil in RI...I used a tablespoon of dry)


Pre-heat the oven to 350 degrees. Mix all the ingredients in a large bowl. Yes by hand, just stick them in there and get mooshing, well make sure you wash your hands first, then get mooshing. If it seems a little loose add a bit more breadcrumbs, too dry add a little more milk.

Roll them loosely about the size of golf balls and place them on a foil lined baking sheet. This recipe makes about 40 meatballs. I usually put 20 on each try and half way through the baking time I will rotate the trays from top to bottom, bottom to top. You get the picture. Cook for approximately 40 minutes.

If 40 meatballs is too much for you (it never is for us), you can freeze them for use later.

Happy 65th Mom!

My Mom turned 65 this weekend. We had her over for dinner (I made Pot Roast at her request). We celebrated with a home made ice cream cake (also her request). Yes it looks a little drippy in the photo. It had been out for a 15 minutes or so. I bought her (and me) a Simple Human soap dispenser, which I absolutely love! It matches all the stainless steel in my kitchen too! I think my Mom was happier that she can now go on Medicare than anything else.

Happy Birthday to the woman they call "The Saint" for putting up with my crazy Dad, watching her goofy grandsons every day and dealing with the bunch of us. I don't know what I would do without ya Mom.
Posted by Picasa

Saturday, January 26, 2008

Roasted Brussel Sprouts


You’re either going to say “Yuck, Brussel Sprouts” or “Yum, Brussel Sprouts”. They seem to be that kind of a vegetable. I love them. In fact, I would put them in my top 10 of veggies that I love. If you haven’t had a roasted Brussel sprout, then you haven’t really had a good Brussel sprout. Roasting brings out a whole new flavor that cannot be compared to boiled sprouts. It brings out the sweetness and cuts out that cabbagey flavor. They are crispy and caramelized on the outside and tender on the inside. I like to let them get really browned on the edges, and then as soon as I get them out of the oven I give them a sprinkling of ground garlic sea salt just before serving. Mitch didn’t think that he liked Brussel sprouts….then he had mine.


Roasted Brussel Sprouts
I buy fresh Brussel sprouts, sold here in little round cardboard containers. I'm sure you could use frozen ones, but I have always used fresh.

Place 2 containers of sprouts into a bowl. Sprinkle with salt and pepper, then toss with a good olive oil. You don't want them swimming in oil, just a nice coating. Place on a baking sheet and put into a 400 degree oven for 30 - 45 minutes. Turn once during cooking. You want them to be nice and caramelized looking. Sprinkle with another dash of salt and serve immediately.

Baklava - The Sicilian girl goes Greek

Thanks to 2 members of the food board I frequent, Dana and Stixx for this recipe. Baklava is one recipe I have always wanted to try but was too intimidated by phyllo to give it a go. I finally said "I can do this" and I did. It wasn't as pretty as Dana's. I think I cut too many diagonal lines. Oh well. I had a bite late last night and it sure tasted good. I also didn't put in as many layers of phyllo as I should have between the layers of nuts. I read and re-read the recipe about 10 times and still I screwed it up. It did taste like Baklava should, so I guess I didn't screw it up too badly.

Here's the recipe from Dana's blog http://cookingatcafed.blogspot.com/


Baklava
Makes one 9x13 glass pan of goodness. Serve with strong coffee or a couple of gallons of milk.A syringe of insulin might also prove to be handy.

Nut mixture
Half pound walnuts
Half pound almonds
1/2 c. sugar
2 t. cinnamon
Syrup
1 1/2 c. sugar
1 1/2 c. water
2 T. honey
1 T. lemon juice
1 cinnamon stick
Several whole cloves (We used 4 and it was good.)

1 package of phyllo (one from a 16 oz. -two package box)
1 c. (two sticks) unsalted butter, melted

Defrost the phyllo according to the directions on the box. Heat oven to 300.

Meanwhile, gather the ingredients.

In a medium saucepan (small one will make a mess as syrup boils), combine all ingredients and bring to a boil. Let boil (higher than simmer, but not raging boil) for 15 minutes. As Alton Brown says, this is pretty much "culinary napalm" so be careful with that syrup. When the 15 minutes is up, turn off the heat, let it cool a bit and then put it in the refrigerator.

While the syrup is boiling, chop the nuts in food processor until slightly coarse. (I find it easier to do the almonds first, then add the walnuts and pulse a couple times more). Add sugar and cinnamon and pulse a few times until combined. Transfer to medium bowl. Don't have a food processor? No problem. You can put them in a gallon-sized freezer bag and pound the heck outts them .Take 13x9 Pyrex pan and place on counter with the bowl of nuts next to it. Take the phyllo out of package and unroll. They will likely be 13x9-ish. (If you got the huge sheets, slice in half the short way and the resulting halves should be only slightly larger than the pan.) There are also packages that have the phyllo in two wrapped packages. These are already the right size.

Working with Phyllo dough: You really need to keep the dough moist while working with it. Take this part seriously.It's easy, just do it. You will want to wet two still-connected paper towels and wring most of the moisture out and keep them on the phyllo when you're not taking a sheet. Failure to do this will result in disaster in a short time. Greek grandmas and aunts will sometimes use a kitchen towel. Whatever floats your boat.With a pastry brush, coat the bottom and sides of the pan with melted butter (I keep the butter in the saucepan I melted it in on the lowest burner setting at all times). Take one layer of phyllo and lay it on the bottom of the pan. (Me? I buttered my bottom.) If it's slightly too long or wide, just fold the edge over, it's okay. Cover the remaining phyllo and brush the sheet in the pan with more melted butter. Repeat five times so that you have six layers of phyllo and butter on the bottom.

The butter. Don't skimp. Besides providing flavor, you are creating a fat layer between the pieces which gives it the flaky crispy texture - while keeping it from simply being layer upon layer of dry stuff that sticks in the back of your throat. This fat layer is important. I heard someplace you can use oil. I suppose you could do that...I'm sticking with butter.Then take a handful of the nut mixture and sprinkle over the top. Spread it around so that it covers in a thin, even layer. Take another phyllo sheet and lay on top of the nut mixture. This next phyllo layer (the one that goes on the nut mixture) is always the hardest to spread the melted butter onto. You may have to use your fingers to keep it in place. Once it's buttered, repeat the phyllo and butter process two more times so that you have three layers on the nuts. Spread more nuts as before. Continue the nuts and three layers of buttered phyllo process until you have five or six sheets of phyllo left. This will be your top layer. These get the individual butter treatment as well. BEFORE YOU STICK THE PAN IN THE OVEN:You have to cut it into diamond shapes. I find it easier to make nine or ten cuts parallel to the longest side, then diagonal cuts. Um, I didn't follow his directions. So, my pieces have that, er, "rustic" look. Sure, that's the ticket. They're "rustic." I'll be following his directions next time... You will need a sharp knife to do this. Dip the knife in hot water if it sticks and the phyllo starts to pull and tear. Once it's cut into diamonds, pour any remaining melted butter evenly over the top. Then put it in the oven. Bake 55-65 minutes, but I'd check after 45 minutes just to be sure. The top layers should be tinged with light brown and because it's a glass pan, you should see slightly darker orange layers at the bottom. AS SOON AS IT COMES OUT OF THE OVEN:Take the syrup out of the fridge, take out the cinnamon stick and cloves, and spoon the syrup all over the baklava. I tend to follow the cut lines, but just make sure that every piece gets some luscious syrup and don't forget the edges. Did he say "spoon?" Oh, we didn't read that part either. We poured it right outta the pan - well, outta a measuring cup. The cold syrup on the hot phyllo bubbled and gurgled and sputtered. It was pretty fun. *I did the same thing, just poured it on.
I'm sure what I did to this recipe would horrify a Greek Grandma. It may not look like the beautiful Baklava I see at the Greek festival, but it sure tastes like it.

Friday, January 25, 2008

Cookies right outta the toaster oven

We have our own little kitchen in the office where I work. We have a little fridge, a microwave, and a small toaster oven. It’s nice and convenient for the 4 of us that use it. Yesterday we all got some big tubs of cookie dough that we bought from one of our co-workers for a fundraiser. I put my tub in my bag, took it home, and totally forgot all about it. This morning at 5:00am when I went to move my bag, I realized the tub of dough was still in there and it was no longer frozen, not even a little bit. Dammit. In the trash it went. I’m so mad at myself for doing that, but hey, it was for a good cause.

There were 2 more tubs of cookie dough in the fridge this morning. They belong to my co-worker Sue. Somehow, someone got the great idea (oh and I do mean great) that we should bake some in the toaster oven and see how they turn out.


Let me tell you this, they turned out delicious. What a nice little treat on a Friday. We had the Oatmeal Raisin ones. After lunch we may try the Chocolate Chunk. There's nothing better then warm cookies for lunch.

I have the best co-workers on earth.

Tuesday, January 22, 2008

Things that make me happy #6

Beautiful Pottery! I'm a total sucker for anything made of pottery. This was yet another Etsy find. Dirt Girl Pottery (see the link to her store at the bottom of this post). I was just cruising through Etsy last week during my lunch hour and it occurred to me that I have lots of rings, and not too many places to keep them organized. They end up on windowsills, or the back of the toilet, etc. I found Dirt Girl of Maine and loved her stuff. Adorable ring holders at a really reasonable price. Then I saw the spoon rests, and the candle holders, you know how it goes. I ended up ordering 5 of the ring holders, a spoon rest (the black matches my stove perfectly) and one of the pillar candle holders. I was like a kid on Christmas opening that box. I plan on keeping 3 of the holders and giving the other two away as gifts....if I can part with them!

http://www.etsy.com/shop.php?user_id=5286233

Monday, January 21, 2008

Chicken Cutlets

Since I was a very little girl I can remember chicken cutlets on the Sunday dinner table. We would drive to Framingham, MA, where my Nonna (Francesca) & Nonno (Paulo) lived and eat for hours. Eating was an event. Along with the artichoke omelets, huge antipastos, roasted chickens, soups, sausages, meatballs, pastas, fresh breads & cheeses, plates of figs and other fresh fruits, there were always chicken cutlets on the table. My Nonna was a great cook. She did not speak English too well, and she did not write in English at all, so nothing ever got written down (gee I wonder where I got that from?). Looking back now I wish I had watched her more closely and written down some of her recipes. Her fig cookies, which my Mom is still trying to duplicate, were just out of this world.

Whenever I make chicken cutlets I think of my Nonna.

Breaded Chicken Cutlets
Boneless chicken tenders
Breadcrumbs
Fresh parsley
Italian seasoning
Parmesan cheese
2 eggs - beaten

Fill a good size bowl with breadcrumbs. Add some fresh chopped parsley and some Italian Seasoning. You can buy the pre-seasoned Italian breadcrumbs if you’d like. Throw in a good hand full of Parmesan and mix it all together.
Beat the two eggs in another bowl .Take your chicken tenders and dip them into the beaten eggs, then into the breadcrumb mixture. You can make these the night before and refrigerate them until you are ready to bake them. I know some people fry their cutlets, but my Nonna always baked them, my Mom bakes them, so I bake them too, besides it’s better for you!

When you are ready to bake them, pre-heat the oven to 350 and bake for 20 – 25 minutes. I line my baking sheet with foil and spray it with a little vegetable oil. Don’t over bake them or they will dry out.

These are great the day after cut up on a salad, or in a sandwich
.

Sunday, January 20, 2008

18-0


I am one very happy Pat's fan right now.


My Sauce Recipe

I bring to you yet another recipe that I have never “officially” written down but have made for more than 20 years now, my sauce recipe. Over the years I have had many people ask me for this recipe. My usual reply was, “come make it with me”. Watch me and learn, cause I never write anything down, I just wing it as I go along. I have given it out in sketchy details, but I have never really sat down and gone step by step with it until now. One thing that surprises a lot of people is that I make my sauce in the crock pot. It’s easy and I can leave it on low for hours and not have to worry about it.

My sauce is fairly thick. It's not overly thick, it's just not a thin sauce. I don’t like thin sauce. Some people do. If you want really thin sauce, don’t use this recipe.

When my garden is booming and fresh tomatoes are available, of course I use fresh. The difference in taste is noticeable. When it is the middle of winter and you have no other choice, use canned. My preferred is Muir Glen, but any brand will do.

Lisa’s Sauce
2 large onions - chopped
Olive oil
Garlic (lots of it)
Basil
Bay leaves
Italian seasoning
3 – 28oz can crushed tomatoes
2 – 3 6oz cans tomato paste

In a large skillet heat enough olive oil just to cover the bottom of the pan. When it’s good and hot throw in your onions and give the pan a good pinch of salt. Cook the onions until they are soft and translucent. When they are almost done, rough chop about 6 cloves of garlic. Don’t mince them fine, leave then in pretty good hunks. Add them to the pan and let them cook for about a minute with the onions. Turn heat off and set aside.

Now get your crock pot out and open up 3 can of the crushed tomatoes. As I empty each can, I rinse it out with a little bit of water that I throw back into the crock pot. You don’t want to add a lot of water back in, just enough to rinse the sauce away from the side of the can. Empty 3 cans of paste and add. I don’t rinse these. Throw in a few bay leaves, some fresh basil if you have it, if not dried it fine. I use fresh herbs whenever possible, but sometimes you just can’t get fresh, especially here in the winter. Grab a good tablespoon full of dried Italian seasoning and rub it between the palms of your hands and put that in the pot. This helps release some of the essential oils, and will add more flavor to your sauce. Now grab the pan of onions and garlic and add those in. I let this cook on low in the crock pot all day. You could cook it on high if you are in a hurry, but I would still let it cook a minimum of 4 hrs.

Things I add in from time to time:

Most times I will cook up some spare ribs, or pork chops, or a cheap cut of steak and add that in. Really any meat will do. I always cook the meat about ½ way through before I add it. When I made sauce Friday, I added pork ribs that I got on sale for 99 cents a pound. They fell apart in the sauce and were so tender they melted in your mouth.

Sometimes I will grab a stick of pepperoni and chop it into big pieces and throw it in.

A few times I have thrown in a can of cream of mushroom soup. It really thickens up the sauce and gives it a great flavor.

Experiment with what you like and make it your own. This recipe makes a lot of sauce but you can freeze what you don’t use then just defrost it and re-heat.

As my Dad always says “Mangi Mangi” (Eat, eat!).

Banana Roll


This was breakfast this morning in my house. I made it last night and left it in the fridge overnight as the recipe suggest. This recipe looks more intimidating than it reads. I think I got this from Pinch my Salt, but I can't be sure. I had cut and pasted it into a word document around Thanksgiving time but never got around to making it. I believe this was adapted from a pumpkin roll recipe. The cream cheese filling is just sweet enough and the cake is light and spongy.

Banana Roll
Cake:
Powdered sugar
3/4 C. all-purpose flour
1/2 t. baking powder
1/2 t. baking soda
1/4 t. salt
3 eggs
1 C sugar
2/3 C. mashed banana (2 medium bananas)


Filling:
1 pkg. (8 oz.) cream cheese, softened
1 C. powdered sugar, sifted
6 T. butter, softened
1 t. vanilla extract
1/4 C. powdered sugar (optional)

Preheat oven to 375°F. Grease 15×10 inch jelly-roll pan (also known as half sheet pan); line with parchment or waxed paper. Grease and flour paper; set aside. Spread out a clean, thin dish towel on the counter (make sure the towel is larger than your jelly roll pan); sprinkle liberally with powdered sugar (this can be done using a mesh strainer). In a small bowl, whisk together flour, baking powder, baking soda.

In a large bowl combine eggs and sugar; beat until thickened. Add banana; beat until well mixed. Stir in flour mixture into egg mixture. Spread batter evenly into prepared pan, easing it carefully to the corners with a spatula.

Bake in preheated 375 degree oven for 13 to 15 minutes or until center springs back when lightly touched. Immediately loosen cake from edges of pan; invert cake onto the prepared towel. Remove pan; carefully peel off paper. Roll up cake in towel while hot, starting with 10-inch side. Cool completely on wire rack (will take at least an hour). When cake is almost completely cooled, make the filling: beat cream cheese, powdered sugar, butter and vanilla extract in small mixer bowl until smooth.


Unroll and spread with filling then re-roll cake. Wrap rolled cake in plastic wrap then refrigerate at least one hour (overnight is best). When ready to serve, unwrap cake and place on a platter. Sprinkle with powdered sugar if desired (sift the sugar through a small mesh strainer for a nice presentation). Cut into slices.

Saturday, January 19, 2008

Alta Casbeer's Chicken Fried Steak

I want to thank my friend Dan at one of the food message boards I frequent for sharing his Granny Alta's recipe with me. I researched Chicken Fried Steak recipes for more than a week. I can't begin to tell you how many different variations I found. His Granny's looked good to me and I loved how the recipe was written. She had a whole meal in one recipe "Chicken Fried Steak with Mashed Potatoes, Green Beans, Dinner Rolls and Gravy". We opted for corn this time around. Here is her recipe, word for word, as it was given to me for the Chicken Fried Steak and the gravy.


Chicken Fried Steak
1 lb package or so tenderized or cubed round steak
3 teaspoons or so Worcestershire sauce
2 teaspoons or so A-1 sauce
Salt & pepper to taste
1 egg
3 tablespoons (1 good glug) milk
1 - 12 oz can evaporated milk
6 tablespoons flour
4 tablespoons oil or Crisco

Add Worcestershire, A-1, salt and pepper to both sides of the steaks. In a wide shallow bowl, beat eggs and milk together. Dip meat into flour, then egg, then flour again, turning several times until thoroughly coasted. When oil is hot, add meat. Cook on one side until flour is bloody or bottom crust is brown. Flip and cook on other side until brown on both sides. Remove from heat and sit on oven to keep warm.

Add the rest of the flour from plate into skillet until all grease seems kid of absorbed. Add couple dashes of salt & pepper. Stir flour into oil and drippings and continue at medium high until roux is brown. Gradually stir in evaporated milk until gravy forms. Stir constantly until cooked way before desired thickness, then put in bowl. Serve over mashed potatoes.

It was really delicious. The A-1 and Worchestire gave it a nice little kick. A keeper for sure. Thanks Granny Alta.

Thursday, January 17, 2008

Things that make me happy #5

Rice Flower & Shea Body Splash. My favorite scent is Bath & Body Works Rice Flower & Shea. Of course this is also one of the scents that B&BW does not carry year round. I did not find this out until I ran out of it, went looking for another bottle and was told “ We only carry that scent in January” January? It was August when I ran out, so I have to wait 5 months to buy it?

Luckily for me back in August I put a reminder on my calendar to “call BBW re: RF&S” That’s really what the reminder said, and I actually knew what I meant by it. Amazing. So I called Tuesday and the perky salesperson told me not only did they have it in stock, it was on SALE for $4.00 a bottle. You have got to be kidding me I tell her. No I am not she says and then to make my life even sweeter than it already is she tells me if I buy 6 of them they will be $20. $3.33 each! Oh I was so there.

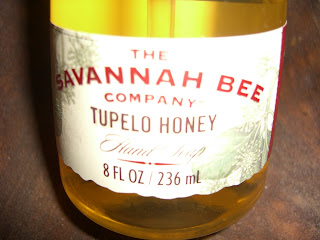
I walked in, went straight to a salesperson and asked her to point me in the direction of the Rice Flower & Shea body spray. I grabbed 6. I was heading for the register (I swear I was) and then out of the corner of my eye I see sale sign, a 75% off sales sign. These kinds of signs make me very happy. I wandered over and the first thing that caught my eye was the Savannah Bee Collection (which they are discontinuing, Boo B&BW, but yeah for me). The first bottle I pick up says Tupelo Honey on it. Liquid Honey Hand Soap. Doesn’t that just sound good? Someone made this just for me. I’m sure of it. Now those of you who know me are well aware that Tupelo Honey by Van Morrison is one of my favorite songs. I had to have this bottle. It has little bees on it! I love bees. Then I saw the beeswax hand cream and the Mint Julep lip balm (we all know about me and lip balm) and then some liquid honey soap for gardeners. Joy.

I walked out with my bag (which was so heavy she had to double bag it, thankyouverymuch). I pulled everything back outta the bag in the car, cause that just how I am when I buy something I like, I must check it all out again as soon as humanly possible. I oohed and ahhhed over my purchases, laid them out all over the table when I got home and spritzed some on myself. I was happy. Later as I was sitting on the couch Evan plopped down beside me, sniffed, wriggled his nose and proclaimed, “You stink Mom”. Very nice.

Tuesday, January 15, 2008

Johnny Rockets - a first for me.

I have never been to a Johnny Rockets until tonight. Now we don't usually go out to eat during the week, but I found out there was a huge sale at Bath & Body Works (more on my loot from there later) and we had to drive right by Johnny Rockets to get to it, so since I've never been to one, and John goes to the one in Providence (the "big city" to me), we decided to stop for a burger.
I am new to the burger world. I didn't eat red meat for 25 years and I am slowly getting back my love of the hamburger. I have to say the burger I ordered was wonderful. It's hard to get a wonderful outta me over a burger, but this one was. I got the Route 66 burger that came with sauteed onions and mushrooms and of course cheese, John got one called the St. Louis that was loaded with bacon (one of this favorite things on earth). It really was melt in your mouth delicious. They serve them to you wrapped in wax paper and when the waitress asked if I would like ketchup, I was tickled to see her take a little paper bowl and make a smiley face with it. The edge of the bowl said "Hope you're smiling too!" Dawwwww. My smiley face does look a tad bit demonic though.
The atmosphere was like a 1950's diner and at one point most of the waitstaff broke into song and dance (Respect by Aretha). It was very cute, of course I sang alone and responded to the "whoop, whoops" when they signaled for them. We were in and out in about a half hour. I never had a burger, that was so good, served so fast. No wonder John wants to go there everyday for lunch.

Monday, January 14, 2008

The dog of white who loves the man in black.

This is my dog Moose. He loves Johnny Cash. He won't sing to just any ole song, no siree. Johnny Cash is his favorite. He is particularly fond of Ring of Fire and Walk the Line. He also will chime in on Happy Birthday when we are celebrating. The only Christmas song he will sing to is Rudolph. Singing takes a lot out of him.....he's napping now.


Panko Pork Chops

I’m a bargain shopper. A lot of my meals are created around what’s on sale, what I found a good deal on at BJ’s Wholesale or Sam’s Club, what’s in season, etc. Last week pork chops were on sale so I picked up a pack. We haven’t had pork chops in a really long time. I looked up a few recipes, narrowed it down to 2 and then decided I would just wing it and make up my own recipe. Sorry no photos we ate them too fast!

Lisa’s Panko Pork Chops
6 good size center cut, bone in chops
3 tablespoons Dijon mustard
2 tablespoons Hellman's mayo
*Panko breadcrumbs
Lawry’s seasoning salt

I prepped these yesterday then popped them in the fridge so I could just throw them in the oven when I got home from work.

Mix the mustard and mayo in a small bowl. In a shallow pie plate mix 1 tablespoon of Lawry’s seasoning salt with a good amount of Panko. Coat each pork chop with the mustard/mayo mixture and press into Panko covering both sides.

Bake at 350 for 25 mins or until internal temp reaches 155. Cover with foil and let rest for 5 mins. Temperature will continue to rise.

The mustard/mayo mixture gave the pork chops a really nice flavor, not overly mustardy. I will be making these again.


*Panko is a Japanese bread crumbs. They are lighter, crispier, and crunchier than traditional bread crumbs. Our local Wal-Mart now carries them, but I get mine at Whole Foods.

Sunday, January 13, 2008

Great Pizza without an 800 degree oven.

When in doubt, see what the folks at Cooks Illustrated would do, and that’s just what I did. This was a recipe for Pizza Magherita that I had to kind of adapt since fresh basil in January is hard to come by in RI. The finished product was terrific...thin and rustic with a nice crispy texture. If you are a thin pizza lover this is the recipe for you.

This recipe requires a pizza stone and a peel. Convection ovens will produce a lighter, crispier pizza, and you will need to reduce the overall cooking time by a minute or two. You can shape the second dough round while the first pizza bakes, but don't add toppings until just before baking. You can let the dough rise overnight in the refrigerator if you like; place the dough balls on a floured baking sheet and cover with plastic wrap coated with nonstick cooking spray. If using mozzarella packed in brine, pat the cheese cubes dry before placing them on the pizza.

1 ¼ teaspoons instant yeast
1 cup water, room temperature
1 ¾ cups unbleached all purpose flour, plus extra for work surface and peel
1 cup cake flour
1 ½ teaspoons table salt
2 teaspoons sugar
Pizza topping of your choice

Makes two 12 inch pizzas.

FOR THE CRUST: Adjust oven rack to lowest position, set pizza stone on oven rack, and heat oven to 500 degrees. In liquid measuring cup, whisk yeast into water to dissolve. In food processor fitted with metal blade, process flours, salt, and sugar until combined, about 5 seconds. With machine running, slowly add liquid through feed tube; continue to process until dough forms satiny, sticky ball that clears sides of work bowl, 1 1/2 to 2 minutes. (If after 1 minute dough is sticky and clings to blade, add 1 to 2 tablespoons all-purpose flour and continue processing. If dough appears dry and crumbly, add 1 to 2 tablespoons water and process until dough forms ball.) Divide dough in half and shape into smooth, tight balls. Place on floured counter or baking sheet, spacing them at least 3 inches apart; cover loosely with plastic wrap coated with nonstick cooking spray and let rise until doubled in volume, about 1 hour.

TO SHAPE AND COOK THE PIZZAS: When dough balls have doubled in size, dust dough liberally with flour and transfer balls to well-floured work surface. Press one ball into 8-inch disk. Using flattened palms, gently stretch disk into 12-inch circle, working along outer edge and giving disk quarter turns. Lightly flour pizza peel; lift edges of dough round to brush off any excess flour, then transfer dough to peel. *I used cornmeal on my peel instead of flour. Spread thin layer of tomato sauce over dough with rubber spatula, leaving 1/2-inch border around edge. Slide onto stone and bake until crust begins to brown, about 5 minutes. Remove pizza from oven with peel, close oven door, and top pizza fresh mozzarella, spaced evenly apar
t. Return pizza to stone and continue cooking until cheese is just melted, 4 to 5 minutes more. *I topped the pizza and let it cook for 10 mins. Transfer to cutting board; sprinkle with half of remaining basil, 1 teaspoon olive oil, and pinch salt. Slice and serve immediately. Repeat steps to bake second pizza.

I wanted to keep the toppings fairly simple. Since fresh basil wasn’t an option I chose to use dried. I had caramelized some onions early in the day for my pizza. I added some freshly grated parmesan and artichoke hearts to mine too. John stuck with pepperoni and mozzarella.

Saturday, January 12, 2008

Crescent Layer Bars

This is one of those recipes. You know the recipes you cut out of a magazine, stick in your recipe book, and look at it and say "I should try those" but you never do. Well today I did. What a simple recipe. After I got done photographing them I took a small bite. Wow, this are rich and gooey. I think I may have to cut my bars in half again.

Crescent Layer Bars

1 can (8 oz) Pillsbury® refrigerated crescent dinner rolls (mine was 10oz)
1 cup white vanilla baking chips
1 cup semisweet chocolate chips
1 cup slivered almonds
1 cup cashew halves and pieces
1 can (14 oz) sweetened condensed milk (not evaporated)


Heat oven to 375°F (350°F for dark pans). Grease bottom and sides of 13x9-inch pan. Unroll dough into 2 long rectangles. Place in pan; press over bottom and 1/2 inch up sides to form crust. Bake 5 minutes.

Remove partially baked crust from oven. Sprinkle vanilla chips, chocolate chips, almonds and cashews evenly over crust. Pour condensed milk evenly over top.

Return to oven; bake 20 to 25 minutes longer or until golden brown. Cool 10 minutes. Run knife around sides of pan. Cool 1 hour. Refrigerate 30 minutes or until chocolate is set. For bars, cut into 9 rows by 4 rows.

Farm Fresh Eggs

I finally found another source for farm fresh eggs. For years one of the men I worked with had loads and loads of chickens and with those chickens came loads of eggs that he sold to co-workers. Well he got older and decided that he was done with the chicken business, so there went my source. I was sad. I went years without a fresh egg then...along comes Ron, another co-worker who just bought a house way out in the boonies with lots of land. Ron bought himself some chickens and BINGO! I had fresh eggs again! I was thrilled when I heard he was selling them. $1 a dozen, how can ya beat that? Ya can't my friend. I give him $2 a week, my empty egg cartons and tell him to keep them coming. What I don't use in a week I give to my Mom, so the fresh eggs are shared.

If you haven't had a farm fresh egg you don't know what you're missing. The yolks are bright orange, the whites are clear, and the taste is fresh and wonderful. Yup there is dirt on them and hay and sometimes even a little poo but I feel better knowing that the chickens are happy and roam free and no one shoved chemicals down their little yellow beaks. Happy chicken, happy eggs, happy me!

Thursday, January 10, 2008

Is this my kid or what??

This photo hangs on my refrigerator. It is a constant reminder of how alike Evan and I are. Not only does he look like me, but also he has a lot of the same character traits that I do.

When he was really little and had blonde curls that trailed down his neck, my Mom would often look at him and say how much he looked like me at the same age. I never really thought about it too much until I came across this wrinkled picture of me at age 2. I had just taken Evans picture for a Christmas photo and remembered the picture of me that I had found. I put the 2 photos side by side. Amazing. His eyes are the same black/brown that mine are, the nose….exact, the lips, big and pouty like mine too. Even our hair was the same color.

There is no denying that he is mine.


I just hope for his sake, he grows over 5 feet tall.

Tuesday, January 8, 2008

Things that make me happy #4

My custom made necklace.

This was a Christmas present from John. I had seen it on Etsy and fell in love with it. If you haven't shopped on Etsy....well what the hell is stoppin' you? Oh you don't know what Etsy is?? Well let me enlighten you grasshopper. Etsy is a marketplace where individuals sell handmade items. It's not like Ebay, you don't bid on the items, the price is listed and you just BUY! They have some beautiful, unique gifts you won't find anywhere else so....... go forth and shop!

Okay now back to my necklace that I love. I love that it's square and that the hand stamping it not perfect. I love the little heart in the middle and that the names of the people who I love more than life itself are always with me.

Monday, January 7, 2008

Blueberry Crumb Cake

Besides Alton Brown, one of my favorite people on Food Network is Ina Garten, the Barefoot Contessa. I love to watch this woman cook. She calms me. I want to cook like she does, but never seem to find myself in the stress-free, relaxed atmosphere that she surrounds herself in. I watched her make Blueberry Crumb Cake yesterday and decided that I just had to make it. I have loads of blueberries in the freezer from the multiple pickings that Eva and I did in August, so recipes with blueberries in them are always welcome.


Blueberry Crumb Cake

For the streusel:

1/4 cup granulated sugar
1/3 cup light brown sugar, lightly packed
1 teaspoon ground cinnamon
1/8 teaspoon ground nutmeg
1/4 pound (1 stick) unsalted butter, melted
1 1/3 cups all-purpose flour

For the cake:
6 tablespoons unsalted butter, at room temperature (3/4 stick)
3/4 cup granulated sugar
2 extra-large eggs, at room temperature
1 teaspoon pure vanilla extract
1/2 teaspoon grated lemon zest
2/3 cup sour cream
1 1/4 cups all-purpose flour
1 teaspoon baking powder
1/4 teaspoon baking soda
1/2 teaspoon kosher salt
1 cup fresh blueberries
Confectioners' sugar for sprinkling

Preheat the oven to 350 degrees F. Butter and flour a 9-inch round baking pan.

For the streusel: Combine the granulated sugar, brown sugar, cinnamon, and nutmeg in a bowl. Stir in the melted butter and then the flour. Mix well and set aside.

For the cake: Cream the butter and sugar in the bowl of an electric mixer fitted with the paddle attachment on high speed for 4 to 5 minutes, until light. Reduce the speed to low and add the eggs 1 at a time, then add the vanilla, lemon zest, and sour cream. In a separate bowl, sift together the flour, baking powder, baking soda, and salt. With the mixer on low speed, add the flour mixture to the batter until just combined. Fold in the blueberries and stir with a spatula to be sure the batter is completely mixed. Spoon the batter into the prepared pan and spread it out with a knife. With your fingers, crumble the topping evenly over the batter. Bake for 40 to 50 minutes, until a cake tester comes out clean. Cool completely and serve sprinkled with confectioners' sugar.

Sunday, January 6, 2008

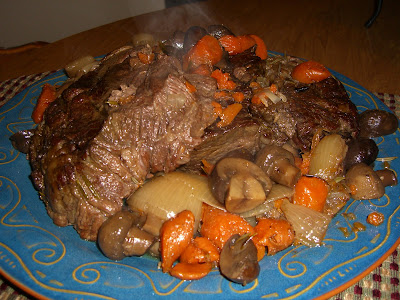
Pot Roast

Once again, I got my inspiration for tonight's dinner from Pioneer Woman. Her latest blog was titled 2008: The Year of the Pot Roast. After this came out of the oven, I kinda hafta agree with her.

Pot Roast
4 - 5 pounds of boneless chuck roast (mine was 4 1/2)
5 small onions
6 carrots
2 - 10 oz. packages of mushrooms (I used both baby bellas and white buttons)
2 cups beef broth
Sprig of fresh Rosemary

In a large heavy pot add 2 tablespoons of olive oil. Make sure the pan is smoking hot when you add the oil. Peel and cut your onions, trying to leave the root end as much in tact as possible. Take the onions and lay them cut side down and let them get browned. Wash the carrots (I did not peel mine, just gave them a good scrub) and cut them in good size chunks on an angle so the carrots have more surface area to brown in the pan. Remove the onions, add more oil if you have to and let the carrots brown up a bit too. Set these aside as well.

Now take your chuck roast and season it well with salt and pepper and repeat as above. Let it get a good sear on both side. Don't move it around in the pan, let it get nice and brown. I tipped the sides and browned them too.

Add carrots and onions back in the pot with the roast. Cut the larger mushrooms in half, the smaller ones I just threw in whole. Add those as well. Throw in a good size sprig of Rosemary. Don't skip this step, it makes a world of difference. Pour in the beef broth until it comes about half way up the roast, remember the mushrooms will add more liquid as they cook too.

Pop it into a 275 degree oven. Mine cooked for 4 hours and the meat was just falling apart. We cut it with a fork that's how tender it was. John must have told me about 6 times "God hunny that was so good", and it was.


Homemade Egg Noodles

I watched my mother-in-law make these home made egg noodles when she visited in October. These are the noodles that her Grandmother, Mrs. Edna May Hinderschott made. How’s that for a name? Everyone loved them. There not pretty like the ones in the store, but damn they’re good.

Start with about 2 cups of salted (about a teaspoon) all purpose flour and make a little well in the center. Drop an egg in and dig your hands in and start kneading. If it seems too dry (which mine did) add another egg.

Knead until you get nice firm dough.


Roll the dough out until it’s about a ¼ inch thick and let it dry for 3 -4 hours. I transferred my dough to a cookie rack so the air would circulate under it.

Now roll the dough up and slice it fairly thin, about the size of fettuccini. The noodles will puff up a lot when you boil them. You’ll have a bunch of little jelly roll looking spirals of dough. Unroll them and put them in a pan of salted boiling water for approximately 20 mins. You will need to pull one out and test it after 20 mins.

Because we are eating these with pot roast, I cooked them in water. When we ate them as a side dish when my mother-in-law was here, we used chicken broth. They were delicious and were devoured promptly.


A new kitchen set!!

I am so excited. We just bought that, look down!! My old set, which was a hand me down and is over 45 years old, finally had it. I put a bowl of soup down on the table last weekend and I noticed the soup was tipping on an angle. Funny, my bowl must be warped. Checked the bowl, it looked okay. So I set another bowl down and it was was doing the same thing. I crouched down and looked under the table, oh, not good. The big wooden bracket thingy in the middle looked like it was buckling. John took at look at it and said it had been fixed many times before, nothing he could do. Oh well, I guess I must force myself to go out and buy a brand new kitchen set for the first time ever in my life!!


After much comparison shopping this is what we got. It's totally country and total me (and John). I love it. It should be here in about a week. The chairs even have leaves carved into them.


Just think of how excited I'm going to be when I finally get my new gigantic kitchen...someday! This will look fabulous in it!

Saturday, January 5, 2008

Hi, I'm Lisa and I'm a Lip Balm Addict

I don't know when it happened. I don't know how it happened, but somehow over the last few years I have become addicted to chapstick and all other sorts of balms and "lip treatments". It's an illness I tell you. I feel compelled to have my lips covered in some sort of petroleum goo at least a dozen times a day. I'm not even the kind of girl who wears lipstick fer God's sake! How did this happen?

In addition to the dozens of little tubes I have in almost every room of the house, I have several in my car and my office has at least a half dozen in drawers, paperclip holders and stashed under the computer monitor. I carry 3 with me in my purse at all times, year round. Oh no, chapstick is not a seasonal application for me. It's year round baby. You never know when your lips will feel a tingle, a burn, a touch of dryness.

Today I took gander at the website for my all time favorite, Neosporin Lip Treatment. In the frequently asked questions section was this:

Q.How often can I apply NEOSPORIN LT® Lip Treatment?
A. Apply to the affected area not more than 3 to 4 times daily.


3 or 4 times daily!!!! Are these people mad?? I couldn't make it through the morning without 3 or 4 applications.

Luckily for me the Today Show had a segment on this morning all about this very subject and there was a dermatologist on, a cert-tee-fied Doctor and she said it's okay. My addiction to lip balms is okay. Phew. Thanks Doc.

Just so you don't all think I am a total freak, there is a time during the day when I don't even think about putting on Chapstick, or Blistex, or Neosporin LT, and that's right before I go to bed. In fact the bedroom is probably the only place in the house that is a balm free zone. Nope when I go to bed, every single night of my life, I slather my lips in Vaseline.

Starve a cold, feed a fever?

Feed a cold, starve a fever I say. John has had a miserable cold since New Years. He’s one unhappy person at the moment. I thought I should make him homemade chicken soup to help his stuffed up nose. He does sound quite funny though. Once again I have no real recipe for this. In a way I guess this blog will be helpful for those of you who always ask me for the written recipe of something that you have had at my house to which my reply is usually “It’s not written down, it’s just in my head”. So outta my head and on to a computer screen it goes.


Lisa's Chicken Soup
1 large onion, chopped
2 cloves garlic, crushed with garlic press
4 carrots, sliced
3 stalks of celery, sliced
8 chicken thighs, baked with skin removed
1/2 pkg. medium egg noodles
8 – 10 cups of chicken stock
Fresh minced parsley
Mrs. Dash

The first thing I do is cook the chicken. I tend to use thighs in most of my soups. You can’t over cook them and the meat from the thighs is really juicy and tender, perfect for soups. I find the whiter meats are much dryer for soup making so I usually try not to use them. Place the thighs on a large sheet pan covered in tin foil. Brush a little olive oil over each of them and sprinkle with Lawry Seasoning salt or Mrs. Dash or whatever you have that you like. Cook the chicken for about 30 mins at 350 or until the juices run clear. While they are cooling you can start on your veggies.

I start my chicken soup, well almost all my soups, with olive oil and onions. In a big pot put a few good tablespoons of olive oil and add the onions. Cook the onions until they are translucent. At the last few minutes add the garlic. Pour your stock into the pan on low heat. I use my mandolin to cut the celery and carrots in nice thick slices. Add these to the pot as well. If you want more carrots, add more, more celery…knock yourself out. All these quantities are strictly approximate. That’s what I like about soup; you can add whatever you like really. Add the parsley and some Mrs. Dash. No measurements, just sprinkle some in until it looks right. Now turn the heat up to high and let the soup come to a slow boil. As soon as you see it boiling, turn the heat back down to low. Test your veggies every once in awhile. You wants them to get tender but you don't want them to cook too much and fall apart. While the veggies are cooking remove the skin from the chicken thighs. Pick the chicken up with your hands and shred it. Yes, your hands are going to be mucky and greasy but there is no way around it. Set shredded chicken aside.

Now in a separate pan cook your egg noodles. For this recipe I used some Amish egg noodles that my mother-in-law sends us. She keeps up well stocked in Amish noodles. I used about half a bag and cooked them until they were really al dente then added them to the pot along with the shredded chicken. I let that all simmer another ten minutes and soups on!